<?xml version="1.0" encoding="utf-8"?>
<feed xmlns="http://www.w3.org/2005/Atom" xml:lang="en">
  <title>Posts tagged with “Development” on Mark van Lent’s weblog</title>
  <updated>2025-06-08T00:00:00+00:00</updated>
  <link rel="self" type="application/atom+xml" href="https://markvanlent.dev/tags/development/index.xml" hreflang="en"/>
  <id>tag:markvanlent.dev,2010-04-02:/tags/development/index.xml</id>
  <link rel="alternate" type="text/html" href="https://markvanlent.dev/tags/development/" hreflang="en"/>
  <author>
      <name>Mark van Lent</name>
      <uri>https://markvanlent.dev/about/</uri>
    </author>
  <rights>Copyright (c) Mark van Lent, Creative Commons Attribution 4.0 International License.</rights>
  <icon>https://markvanlent.dev/favicon.ico</icon>
  <entry>
    <title type="html"><![CDATA[Full circle: rediscovering my joy in software engineering]]></title>
    <link rel="alternate" href="https://markvanlent.dev/2025/06/08/full-circle-rediscovering-my-joy-in-software-engineering/" type="text/html" />
    <id>https://markvanlent.dev/2025/06/08/full-circle-rediscovering-my-joy-in-software-engineering/</id>
    <author>
      <name>map[name:Mark van Lent uri:https://markvanlent.dev/about/]</name>
    </author>
    <category term="development" />
    <category term="go" />
    <category term="personal" />
    <category term="python" />
    
    <updated>2025-06-08T16:08:56Z</updated>
    <published>2025-06-08T00:00:00Z</published>
    <content type="html"><![CDATA[<p>This is a different kind of post than I normally write here. Most other posts
are about a problem I ran into or a conference I visited. This time is more a
story telling post. I though it would be nice to have a sort of summary of what
kind of work I have been doing for the last decade.</p>
<p>For years I&rsquo;ve have had a page <a href="/about/me">about me</a> which tells a bit of my
background and past and present jobs. In this post I would like to zoom in on,
roughly, the last thirteen years and write a bit about how my work and interests
evolved.</p>
<h2 id="software-developer">Software developer</h2>
<p>Let&rsquo;s start with my job at <a href="https://www.fox-it.com/">Fox-IT</a>, the company I
joined as a
<a href="https://www.djangoproject.com/">Django</a>/<a href="https://www.python.org/">Python</a>
developer mid 2013. I started building a portal for the customers of their
managed <a href="https://en.wikipedia.org/wiki/Security_operations_center">SOC</a> service
and I figured that&mdash;once this portal was done&mdash;I would find something else
within Fox to work on. However, this project only grew in functionality and even
became the tool used by the SOC analysts to get alerted on new incidents and
start their analysis in. I think all in all I spent the first four to five years
at Fox working on this platform on a daily basis.</p>
<p>Meanwile, due to organisational changes, my team was supposed to become less
dependant on a different business unit and as a ressult we would need to manage
our own infrastructure more. I&rsquo;ve always been interested in that kind of work,
so I started picking that up. And due to my background as a developer I wanted
to automate as much as possible. As a result my days started to become more an
more about creating and maintaining a testing environment. (I also have to admit
that messing around with physical servers was fun, especially initially.)</p>
<h2 id="infrastructure-developer">Infrastructure developer</h2>
<p>Slowly my work had become more about the infrastructure surrounding the product
we were developing, than writing code for the product itself. In hindsight I
think it was about 2018 when I was effectively no longer a developer on the
product. Instead of implementing features I was using
<a href="https://www.packer.io/">Packer</a> to create template for machine images, writing
<a href="https://www.terraform.io/">Terraform</a> to use these images (and managing other
infrastructure) and using
<a href="https://en.wikipedia.org/wiki/Ansible_(software)">Ansible</a> to help deploy the
product, et cetera.</p>
<p>Did I overengineer it? Probably. Did I like it and have I learned a lot from it?
Definitely!</p>
<p>Because I dislike the term &ldquo;DevOps engineer&rdquo;, I decided to call myself an
&ldquo;infrastructure developer&rdquo;. (Though I have to admit that on my CV and social
media profiles I used the title DevOps engineer when I was applying for a new
job since&mdash;whether I liked it or not&mdash;that is a more familiar term.) Looking
back to this now, there was also a clue hidden in there, but I&rsquo;ll get back to
that.</p>
<p>Since I was the only person doing this kind of work for my team, the
organisation figured it would be good to pair up with a colleague who was doing
similar kind of work for a different team to have some redundancy. While in
practice this did not work that well (yes, we had a similar role, but the
platforms and infrastructure were too diverse), it did lead to a new
opportunity.</p>
<p>A different team needed an extra person to help create a self-service, on-demand
environment to perform digital forensic investigations in. And given my interest
in cloud infrastructure (AWS) and my experience, I was a nice fit. I really
liked that project, learned a lot and enjoyed myself. And I wanted to do more of
this kind of work. However, this meant I had to look elsewhere.</p>
<h2 id="mission-critical-engineer">Mission Critical Engineer</h2>
<p>And that is how I ended up at <a href="https://schubergphilis.com/">Schuberg Philis</a> as
a mission critical engineer. As I had expected, this role is heavily operations
focussed. In my case, I helped to <a href="https://schubergphilis.com/how-we-work/plan-build-run">plan, build and
run</a> AWS infrastructure
for one of our customers. Unfortunately it was mostly &ldquo;run&rdquo; though. Don&rsquo;t get me
wrong, I definitely leveled up my AWS skills and genuinely enjoyed my time in
that team. But&hellip;</p>
<p>At a certain point in time our customer wanted to add an existing application to
their mission critical environment. Since it was a Python application (a Lambda
actually) I volunteered to help improve the application so it would be in a
state where we felt comfortable to offer 100% uptime and 24/7 support. Only then
did I realise what I was missing: software development and the joy that it gave
me.</p>
<p>Sure, I had been doing operations related work in the past, but in hindsight
most of the time I was still developing. Not building an application perhaps,
but infrastructure. I had always been more of a developer than an administrator.
I guess that was also why I liked the title &ldquo;infrastructure <strong>developer</strong>&rdquo;.</p>
<p>Lucky for me I was able to switch to a different team.</p>
<h2 id="mission-critical-software-engineer">Mission Critical Software Engineer</h2>
<p>And that&rsquo;s how I ended up where I am today. Little over a year ago I switched to
a role where I can focus on writing software again. And we, as a group of
software engineers, are also responsible for running, monitoring and supporting
our own services. So thinking about infrastructure is still a (small) part of
the job.<sup id="fnref:1"><a href="#fn:1" class="footnote-ref" role="doc-noteref">1</a></sup> But the main chunk of work is software engineering.</p>
<p>One thing did change though. Where my previous development jobs had been Python
oriented, in this team we use <a href="https://go.dev/">Go</a> to write our services. This
was part of my plan: by joining a Go team, I could broaden my horizon by
learning a new language.</p>
<p>Go was not completely new to me. I had done a
<a href="/2018/06/27/devopsdays-amsterdam-2018-workshops/#go-for-ops--michael-hausenblas-red-hat">Go workshop in 2018</a>.
And I had also made an attempt to rewrite an internal Python command line
application in Go. However, I had not properly learned the language, let
alone work with it as part of my job.</p>
<p>I might write more about learning and working with Go in a future post, but that
is beyond the scope of this one. I do want to say I thouroughly enjoy being a
software engineer again and learning how to do things in a differeny language.</p>
<div class="footnotes" role="doc-endnotes">
<hr>
<ol>
<li id="fn:1">
<p>We also have a couple of people in our team who are responsible for
setting up and maintaining the infrastructure we are running our services
on.&#160;<a href="#fnref:1" class="footnote-backref" role="doc-backlink">&#x21a9;&#xfe0e;</a></p>
</li>
</ol>
</div>]]></content>
  </entry>
  <entry>
    <title type="html"><![CDATA[How we use Virtualenv, Buildout and Docker]]></title>
    <link rel="alternate" href="https://markvanlent.dev/2014/09/28/how-we-use-virtualenv-buildout-and-docker/" type="text/html" />
    <id>https://markvanlent.dev/2014/09/28/how-we-use-virtualenv-buildout-and-docker/</id>
    <author>
      <name>map[name:Mark van Lent uri:https://markvanlent.dev/about/]</name>
    </author>
    <category term="development" />
    <category term="devops" />
    <category term="django" />
    <category term="tools" />
    
    <updated>2021-09-24T11:41:49Z</updated>
    <published>2014-09-28T21:53:00Z</published>
    <content type="html"><![CDATA[<p>There are several technologies (in the Python world) to have isolated
environments for projects. In this post I will describe how we use
Virtualenv, Buildout and Docker for a project I&rsquo;m working on at
<a href="https://www.fox-it.com">Fox-IT</a>.</p>
<h2 id="virtualenv">Virtualenv</h2>
<p>The first tool I&rsquo;ll discuss here is
<a href="https://virtualenv.pypa.io/en/latest/">Virtualenv</a>. According to its
documentation Virtualenv is <q>a tool to create isolated Python
environments.</q></p>
<h3 id="what-does-it-do">What does it do?</h3>
<p>It offers a way to install Python packages independent of the global
<code>site-packages</code> directory. This provides you with a way to install
packages even when you do not have permission to write in the global
<code>site-packages</code> directory <em>and</em> it will prevent conflicts with
packages installed there (or in other Virtualenv environments for that
matter).</p>
<p>For instance my current Ubuntu 14.04 installation has the
<a href="https://pypi.org/project/requests/">requests</a> package globally
installed. However, it is version 2.2.1. What if I need a newer
version? Or worse: what if my code is incompatible with a newer
version and the package is updated for some reason (perhaps with a
system upgrade)?</p>
<h3 id="how-do-we-use-it">How do we use it?</h3>
<p>For the project I&rsquo;m working on, we have a couple of small tools
written in Python that we need running in their own separate
environment (on different machines than the code of the main
application). For these tools, creating a virtualenv seems the best
solution. To make it easier to setup the virtualenv, we have a
<code>Makefile</code> sitting next to the <code>setup.py</code> file:</p>
<div class="highlight"><pre tabindex="0" class="chroma"><code class="language-makefile" data-lang="makefile"><span class="line"><span class="cl"><span class="nf">lib/python2.7/site-packages/foo.bar.egg-link</span><span class="o">:</span> <span class="n">bin</span>/<span class="n">python</span>
</span></span><span class="line"><span class="cl">	bin/python setup.py develop
</span></span><span class="line"><span class="cl">
</span></span><span class="line"><span class="cl"><span class="nf">bin/python</span><span class="o">:</span>
</span></span><span class="line"><span class="cl">	virtualenv --clear .
</span></span><span class="line"><span class="cl">	bin/pip install -r requirements.txt
</span></span><span class="line"><span class="cl">
</span></span><span class="line"><span class="cl"><span class="nf">clean</span><span class="o">:</span>
</span></span><span class="line"><span class="cl">	rm -rf bin include lib <span class="nb">local</span> dist
</span></span></code></pre></div><p>This way we can be certain that we have an isolated environment with
the packages we need for this tool (and with the right versions).</p>
<h2 id="buildout">Buildout</h2>
<p>Another tool we use is <a href="https://pypi.org/project/zc.buildout/">Buildout</a>. This
is a <q>Python-based build system for creating, assembling and deploying
applications from multiple parts, some of which may be non-Python-based.</q></p>
<h3 id="what-does-it-do-1">What does it do?</h3>
<p>In contrast to Virtualenv, Buildout does not just create an isolated
environment for your project, but it is also a complete build
tool. Since there are many
<a href="https://pypi.org/search/?q=buildout+recipe">Buildout recipes</a>
available for all kinds of jobs&mdash;for instance to
<a href="https://pypi.org/project/collective.recipe.template/">generate text files from a template</a>,
<a href="https://pypi.org/project/djangorecipe/">install Django</a>,
<a href="https://pypi.org/project/collective.recipe.cmd/">execute commands</a>
or to
<a href="https://pypi.org/project/z3c.recipe.usercrontab/">install user cronjobs</a>&mdash;it
is as versatile as for instance a <code>Makefile</code> or a shell script. This
also makes the learning curve for Buildout a bit more steep than
for Virtualenv.</p>
<h3 id="how-do-we-use-it-1">How do we use it?</h3>
<p>For the application I&rsquo;m currently working on, we use Buildout to build the
components of the system. One of these components is a Django application, so
we&rsquo;ve got this part in our Buildout configuration:</p>
<div class="highlight"><pre tabindex="0" class="chroma"><code class="language-ini" data-lang="ini"><span class="line"><span class="cl"><span class="k">[django]</span>
</span></span><span class="line"><span class="cl"><span class="na">recipe</span> <span class="o">=</span> <span class="s">djangorecipe</span>
</span></span><span class="line"><span class="cl"><span class="na">settings</span> <span class="o">=</span> <span class="s">production</span>
</span></span><span class="line"><span class="cl"><span class="na">eggs</span> <span class="o">=</span><span class="s">
</span></span></span><span class="line"><span class="cl"><span class="s">    Django
</span></span></span><span class="line"><span class="cl"><span class="s">    ${buildout:eggs}
</span></span></span><span class="line"><span class="cl"><span class="s">    ${buildout:dev-eggs}</span>
</span></span><span class="line"><span class="cl"><span class="na">extra-paths</span> <span class="o">=</span>
</span></span><span class="line"><span class="cl"><span class="na">project</span> <span class="o">=</span> <span class="s">my_project</span>
</span></span><span class="line"><span class="cl"><span class="na">wsgi</span> <span class="o">=</span> <span class="s">true</span>
</span></span><span class="line"><span class="cl"><span class="na">wsgi-script</span> <span class="o">=</span> <span class="s">../my_project/wsgi.py</span>
</span></span></code></pre></div><p>But we also generate the Nginx and
<a href="https://pypi.org/project/circus/">Circus</a> configuration using
Buildout:</p>
<div class="highlight"><pre tabindex="0" class="chroma"><code class="language-ini" data-lang="ini"><span class="line"><span class="cl"><span class="k">[circus_ini]</span>
</span></span><span class="line"><span class="cl"><span class="na">recipe</span> <span class="o">=</span> <span class="s">collective.recipe.template</span>
</span></span><span class="line"><span class="cl"><span class="na">input</span> <span class="o">=</span> <span class="s">templates/circus.ini.in</span>
</span></span><span class="line"><span class="cl"><span class="na">output</span> <span class="o">=</span> <span class="s">${buildout:parts-directory}/conf/circus.ini</span>
</span></span><span class="line"><span class="cl">
</span></span><span class="line"><span class="cl"><span class="k">[nginx_conf]</span>
</span></span><span class="line"><span class="cl"><span class="na">recipe</span> <span class="o">=</span> <span class="s">collective.recipe.template</span>
</span></span><span class="line"><span class="cl"><span class="na">input</span> <span class="o">=</span> <span class="s">templates/nginx.conf.in</span>
</span></span><span class="line"><span class="cl"><span class="na">output</span> <span class="o">=</span> <span class="s">${buildout:parts-directory}/conf/nginx.conf</span>
</span></span></code></pre></div><p>This is convenient for us since, amongst other things, we need to
configure a port in both configurations. So the Circus template
contains this section:</p>
<div class="highlight"><pre tabindex="0" class="chroma"><code class="language-ini" data-lang="ini"><span class="line"><span class="cl"><span class="k">[socket:django]</span>
</span></span><span class="line"><span class="cl"><span class="na">host</span> <span class="o">=</span> <span class="s">127.0.0.1</span>
</span></span><span class="line"><span class="cl"><span class="na">port</span> <span class="o">=</span> <span class="s">${custom:webapp_port}</span>
</span></span></code></pre></div><p>And the Nginx configuration template contains this section:</p>
<div class="highlight"><pre tabindex="0" class="chroma"><code class="language-nginx" data-lang="nginx"><span class="line"><span class="cl"><span class="k">upstream</span> <span class="s">django</span> <span class="p">{</span>
</span></span><span class="line"><span class="cl">    <span class="kn">server</span> <span class="n">127.0.0.1</span><span class="p">:</span><span class="nv">${custom:webapp_port}</span><span class="p">;</span>
</span></span><span class="line"><span class="cl"><span class="p">}</span>
</span></span></code></pre></div><p>This port number is set in our Buildout configuration file:</p>
<div class="highlight"><pre tabindex="0" class="chroma"><code class="language-ini" data-lang="ini"><span class="line"><span class="cl"><span class="k">[custom]</span>
</span></span><span class="line"><span class="cl"><span class="na">webapp_port</span> <span class="o">=</span> <span class="s">8080</span>
</span></span></code></pre></div><p>Whenever we build the project, the Nginx and Circus configurations are
generated using that single variable. This makes it nice and
<a href="https://en.wikipedia.org/wiki/Don't_repeat_yourself">DRY</a>.</p>
<h2 id="docker">Docker</h2>
<p><a href="https://www.docker.com/">Docker</a> works on a whole different level to
isolate your environment. Docker is <q>an open platform for developers
and sysadmins to build, ship, and run distributed applications.</q></p>
<h3 id="what-does-it-do-2">What does it do?</h3>
<p>Docker allows you to launch containers to run your applications in. These
containers are based on so called images and these images can either be existing
images built by third parties (made available via e.g. <a href="https://hub.docker.com/">Docker Hub</a>)
or custom made images.</p>
<p>Using Docker is different from using a virtual machine because it does
not include a complete guest operating system. Instead it just runs
the application in an isolated process and shares the kernel with the
other containers. Or as they put it themselves: <q>it enjoys the
resource isolation and allocation benefits of VMs but is much more
portable and efficient.</q></p>
<figure><img src="/images/vm-vs-docker.png"
    alt="VMs vs Docker containers"><figcaption>
      <p>
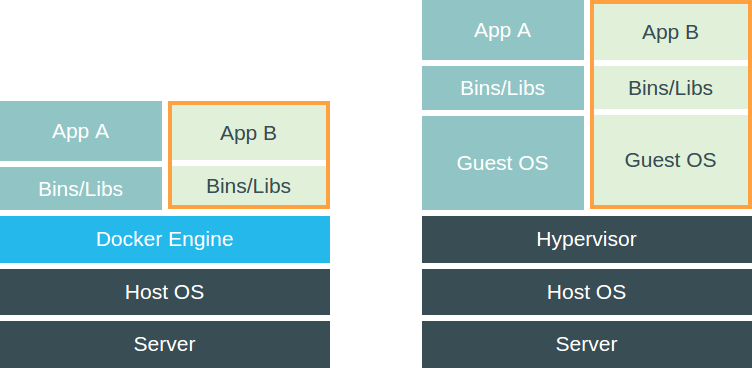
How Docker, on the left, is different from virtual machines, on the right (images taken from the <a href="https://www.docker.com">Docker website</a>)</p>
    </figcaption>
</figure>

<h3 id="how-do-we-use-it-2">How do we use it?</h3>
<p>The application that is being built with Buildout, needs to be
deployed for multiple customers. To handle this deployment, we use
Docker. We create a custom image and make sure that Buildout does
its thing by having a line similar to this in our <code>Dockerfile</code>:</p>
<div class="highlight"><pre tabindex="0" class="chroma"><code class="language-dockerfile" data-lang="dockerfile"><span class="line"><span class="cl"><span class="k">RUN</span> <span class="nb">cd</span> /var/application <span class="o">&amp;&amp;</span> python bootstrap.py <span class="o">&amp;&amp;</span> bin/buildout<span class="err">
</span></span></span></code></pre></div><p>Earlier in the <code>Dockerfile</code> we make sure that the application code is
extracted to the <code>/var/application</code> directory. The <code>Dockerfile</code> also
includes commands to install packages we need on the operating system
level, for instance Nginx.</p>
<p>This way we have an image that contains a version of our application (and its
dependencies) that is good to go. Now all we need to do is run a container based
on this image. By adding environment variables, we have slightly different
settings per customer.</p>
<h2 id="conclusion">Conclusion</h2>
<p>The tools discussed above (Virtualenv, Buildout and Docker) can all be
used to create an isolated environment for your project. In that
regard they are similar.</p>
<p>At the same time, they all have different features so which tool is the &lsquo;best&rsquo;
solution absolutely depends on your situation. And as you can see in this
article: you don&rsquo;t have to chose just one.</p>
<p>The way I would personally &lsquo;categorise&rsquo; them:</p>
<ul>
<li>If a project just needs a couple of Python packages, Virtualenv is
probably a good fit.</li>
<li>If the project is more complex, Buildout provides the tools to set
up the environment.</li>
<li>If the project needs to have a reproducible environment that also
requires packages/configuration on the operating system level,
Docker might be the way to go.</li>
</ul>]]></content>
  </entry>
  <entry>
    <title type="html"><![CDATA[Where did my icons go?]]></title>
    <link rel="alternate" href="https://markvanlent.dev/2014/07/11/where-did-my-icons-go/" type="text/html" />
    <id>https://markvanlent.dev/2014/07/11/where-did-my-icons-go/</id>
    <author>
      <name>map[name:Mark van Lent uri:https://markvanlent.dev/about/]</name>
    </author>
    <category term="css" />
    <category term="development" />
    <category term="html" />
    <category term="icons" />
    <category term="svg" />
    
    <updated>2021-09-24T11:41:49Z</updated>
    <published>2014-07-11T21:54:00Z</published>
    <content type="html"><![CDATA[<p>When I was experimenting with an SVG sprite to replace my current icon
font, suddenly some of the icons disappeared without a clear
reason. It worked fine when I accessed the demo page via the
<a href="https://en.wikipedia.org/wiki/File_URI_scheme">file URI scheme</a>, but
as soon as I used an HTTP server, some of them did not show up.</p>
<p><img src="/images/icons-missing.png" alt="Missing icons" title="Some of the icons are missing"></p>
<p>This puzzled me because I was using the (unmodified) demo page I
downloaded from <a href="https://icomoon.io/app/">IcoMoon</a> and more importantly:
I had seen the icons when I used the file URI scheme.</p>
<p>After inspecting one of the icons, I saw that a user agent stylesheet
had set the &ldquo;<code>display</code>&rdquo; property to &ldquo;<code>none</code>&rdquo; on that element (and a
bunch of others):</p>
<p><img src="/images/icons-missing-devtools.png" alt="User agent stylesheet sets display to none" title="User agent stylesheet sets display to none"></p>
<p>I figured this must have been caused by one of my extensions. And
indeed: after disabling the
<a href="https://adblockplus.org/">Adblock Plus extension</a> the icons appeared
again. Some more tweaking revealed that
<a href="https://easylist.to/#socialblocklist">Fanboy&rsquo;s Social Blocking List</a>
was the culprit. This immediately explained why only the social media
icons were missing. (I had not made that connection yet&hellip;)</p>
<p>For me the solution was to just use a different class name for the social media
icons. I can also disable the list on my machine, but that would only solve the
problem for me. Visitors of the site might have the blocking list enabled and as
a result not see some of the icons.</p>]]></content>
  </entry>
  <entry>
    <title type="html"><![CDATA[Using PyCharm with Django in a Buildout]]></title>
    <link rel="alternate" href="https://markvanlent.dev/2014/05/08/using-pycharm-with-django-in-a-buildout/" type="text/html" />
    <id>https://markvanlent.dev/2014/05/08/using-pycharm-with-django-in-a-buildout/</id>
    <author>
      <name>map[name:Mark van Lent uri:https://markvanlent.dev/about/]</name>
    </author>
    <category term="buildout" />
    <category term="development" />
    <category term="django" />
    <category term="tools" />
    
    <updated>2021-09-24T11:41:49Z</updated>
    <published>2014-05-08T22:26:00Z</published>
    <content type="html"><![CDATA[<p>To introduce a coworker to our project and Django in general, I
suggested that he would try
<a href="https://www.jetbrains.com/pycharm/">PyCharm</a>, a Python IDE. One of the
(many) nice things of PyCharm is that you can easily jump to the place
where something is declared&mdash;ideal for exploring a project.</p>
<p>When you use for instance a
<a href="https://virtualenv.pypa.io/en/latest/">virtualenv</a>, PyCharm will
automatically detect which packages are installed. But PyCharm also
supports <a href="https://pypi.org/project/zc.buildout/">buildout</a>.</p>
<p>As the
<a href="https://www.jetbrains.com/help/pycharm/buildout-support.html">documentation</a>
rightfully claims, PyCharm can automatically detect the use of
buildout and enables support for it automatically. However, it defaults
to using the path from the <code>bin/buildout</code> script. This usually only
adds the setuptools and zc.buildout eggs, so it is of little use.</p>
<p>Assuming you are using the
<a href="https://pypi.org/project/djangorecipe/">djangorecipe</a> buildout
recipe, there is also a <code>bin/django</code> script available. And <em>that</em>
script includes the paths to all the packages you have specified in
your buildout.</p>
<p>To do this, go to the settings, search for &ldquo;buildout&rdquo; and point
PyCharm to the right script.</p>
<p><img src="/images/pycharm-buildout-settings.png" alt="PyCharm Buildout settings" title="PyCharm Buildout settings"></p>
<p>Once you have done that, you can immediately see that code completion
works, but CTRL+click also takes you to the declarations inside
e.g. the Django package.</p>
<p><img src="/images/pycharm-buildout-completion.png" alt="PyCharm code completion in action" title="PyCharm code completion in action"></p>]]></content>
  </entry>
  <entry>
    <title type="html"><![CDATA[Merge a separate Git repository into an existing one]]></title>
    <link rel="alternate" href="https://markvanlent.dev/2013/11/02/merge-a-separate-git-repository-into-an-existing-one/" type="text/html" />
    <id>https://markvanlent.dev/2013/11/02/merge-a-separate-git-repository-into-an-existing-one/</id>
    <author>
      <name>map[name:Mark van Lent uri:https://markvanlent.dev/about/]</name>
    </author>
    <category term="development" />
    <category term="git" />
    
    <updated>2021-08-20T20:23:14Z</updated>
    <published>2013-11-02T15:35:00Z</published>
    <content type="html"><![CDATA[<p>When I started on a project it seemed to make sense to put a part of
the project in a separate Git repository. In hindsight that wasn&rsquo;t
such a smart move. Here&rsquo;s how I fixed it.</p>
<h2 id="the-old-situation">The old situation</h2>
<p>In the old situation I had two Git repositories: <code>&lt;project&gt;</code> and
<code>&lt;package&gt;</code>. In this case <code>&lt;project&gt;</code> was the project repository and
<code>&lt;package&gt;</code> contained only one part of it. (For those interested:
<code>&lt;package&gt;</code> is a Python package which I included into the project
using <a href="https://pypi.org/project/mr.developer/">mr.developer</a>.) A
simplified version of the situation looks like this:</p>
<div class="highlight"><pre tabindex="0" class="chroma"><code class="language-plaintext" data-lang="plaintext"><span class="line"><span class="cl">&lt;project&gt;
</span></span><span class="line"><span class="cl">├── bootstrap.py
</span></span><span class="line"><span class="cl">├── buildout.cfg
</span></span><span class="line"><span class="cl">└── src
</span></span><span class="line"><span class="cl">    └── &lt;package&gt;
</span></span></code></pre></div><p>For several reasons I wanted to merge the <code>&lt;package&gt;</code> repository into
the <code>&lt;project&gt;</code> repository in the <code>src/package</code> path.</p>
<p>There are several ways to approach this. I wanted to end up in a
situation where in my day-to-day work I would not notice that the two
repositories were separate up until a certain point.</p>
<h2 id="what-i-did-not-do">What I did <em>not</em> do</h2>
<p>At first I tried the approach outlined by Jason Karns in his article
<a href="http://jasonkarns.com/blog/merge-two-git-repositories-into-one/">Merge Two Git Repositories Into One</a>. That
is, I did not create a new empty repository to merge the two existing
repositories in. I just merged one existing repository into the other,
essentially only doing the second set of steps he described.</p>
<p>After I finished, I discovered that I could not easily use &ldquo;<code>git log</code>&rdquo;
to see the history of a file. Sure, I could use the &ldquo;<code>--follow</code>&rdquo; option
but that only works for a single file&mdash;not a complete
directory. Apparently this is caused by the &ldquo;<code>git read-tree</code>&rdquo; step. And
although
<a href="https://stackoverflow.com/a/19402332/122661">you can fix this</a>, I
wanted to avoid the situation.</p>
<p>In his article
<a href="http://scottwb.com/blog/2012/07/14/merge-git-repositories-and-preseve-commit-history/">Merge Git Repositories and Preserve Commit History</a>,
Scott W. Bradley describes a way to do the merge without using the
&ldquo;<code>git read-tree</code>&rdquo; command. However, the result is similar due to the
&ldquo;<code>git mv</code>&rdquo; step that is in there.</p>
<h2 id="the-method-i-used">The method I used</h2>
<p>What I wanted apparently was a bit more complex. As a result the
process is also a little more complex. Thankfully I could combine the
previously mentioned articles with a
<a href="https://stackoverflow.com/a/13060513/122661">helpful answer on Stack Overflow</a>. This
resulted in the following &lsquo;recipe&rsquo;:</p>
<p>First clone the <code>&lt;package&gt;</code> repository and go to that directory:</p>
<div class="highlight"><pre tabindex="0" class="chroma"><code class="language-bash" data-lang="bash"><span class="line"><span class="cl">$ git clone ssh://&lt;package-repo&gt; /tmp/package
</span></span><span class="line"><span class="cl">$ <span class="nb">cd</span> /tmp/package
</span></span></code></pre></div><p>Just to be sure we do not commit something in the original repo,
remove the remote:</p>
<div class="highlight"><pre tabindex="0" class="chroma"><code class="language-bash" data-lang="bash"><span class="line"><span class="cl">$ git remote rm origin
</span></span></code></pre></div><p>Then use &ldquo;<code>git filter-branch</code>&rdquo; to rewrite the existing commits so that
the files are already in the right directory (<code>src/package</code> in my case):</p>
<div class="highlight"><pre tabindex="0" class="chroma"><code class="language-bash" data-lang="bash"><span class="line"><span class="cl">$ git filter-branch --index-filter <span class="se">\
</span></span></span><span class="line"><span class="cl"><span class="se"></span>      <span class="s1">&#39;git ls-files -s | sed &#34;s-\t\&#34;*-&amp;src\/package/-&#34; |
</span></span></span><span class="line"><span class="cl"><span class="s1">        GIT_INDEX_FILE=$GIT_INDEX_FILE.new \
</span></span></span><span class="line"><span class="cl"><span class="s1">        git update-index --index-info &amp;&amp;
</span></span></span><span class="line"><span class="cl"><span class="s1">        mv &#34;$GIT_INDEX_FILE.new&#34; &#34;$GIT_INDEX_FILE&#34;
</span></span></span><span class="line"><span class="cl"><span class="s1">      &#39;</span> HEAD
</span></span></code></pre></div><p>(Note that
<a href="https://stackoverflow.com/questions/13060356/git-log-shows-very-little-after-doing-a-read-tree-merge/13060513#comment44550628_13060513">according to Frederik</a>
you have to replace the <code>\t</code> in the <code>sed</code> command with <code>Ctrl-V + tab</code> when
using OS X.)</p>
<p>You can now verify that everything is still all-right, the history is
preserved and all files are located in the new directory.</p>
<p>Now make a fresh clone of the <code>&lt;project&gt;</code> repo:</p>
<div class="highlight"><pre tabindex="0" class="chroma"><code class="language-bash" data-lang="bash"><span class="line"><span class="cl">$ git clone ssh://&lt;project-repo&gt; /tmp/project
</span></span><span class="line"><span class="cl">$ <span class="nb">cd</span> /tmp/project
</span></span></code></pre></div><p>Add the <code>&lt;package&gt;</code> clone as a remote:</p>
<div class="highlight"><pre tabindex="0" class="chroma"><code class="language-bash" data-lang="bash"><span class="line"><span class="cl">$ git remote add -f package /tmp/package
</span></span></code></pre></div><p>Next, merge the new remote:<sup id="fnref:1"><a href="#fn:1" class="footnote-ref" role="doc-noteref">1</a></sup></p>
<div class="highlight"><pre tabindex="0" class="chroma"><code class="language-bash" data-lang="bash"><span class="line"><span class="cl">$ git merge --allow-unrelated-histories package/master
</span></span></code></pre></div><p>Cleanup time: you can remove the temporary <code>&lt;package&gt;</code> remote:</p>
<div class="highlight"><pre tabindex="0" class="chroma"><code class="language-bash" data-lang="bash"><span class="line"><span class="cl">$ git remote rm package
</span></span></code></pre></div><p>By now all code should be in the same place as it was before we
started, but now it&rsquo;s in a single repository. Now would be a nice time
to run your tests to verify that everything went well.</p>
<p>If everything checks out, don&rsquo;t forget to push the result to the
<code>&lt;project&gt;</code> repository. (What you do with the <code>&lt;package&gt;</code> repository
is up to you. I would probably remove it.)</p>
<div class="footnotes" role="doc-endnotes">
<hr>
<ol>
<li id="fn:1">
<p>Update (2017-05-03): I have added <code>--allow-unrelated-histories</code>, which is
needed since Git 2.9. Thanks to Josef, Maurits and Duncan for pointing
this out.&#160;<a href="#fnref:1" class="footnote-backref" role="doc-backlink">&#x21a9;&#xfe0e;</a></p>
</li>
</ol>
</div>]]></content>
  </entry>
  <entry>
    <title type="html"><![CDATA[Font Awesome to PNG]]></title>
    <link rel="alternate" href="https://markvanlent.dev/2013/10/27/font-awesome-to-png/" type="text/html" />
    <id>https://markvanlent.dev/2013/10/27/font-awesome-to-png/</id>
    <author>
      <name>map[name:Mark van Lent uri:https://markvanlent.dev/about/]</name>
    </author>
    <category term="development" />
    <category term="icons" />
    <category term="python" />
    
    <updated>2021-08-20T20:23:14Z</updated>
    <published>2013-10-27T17:09:00Z</published>
    <content type="html"><![CDATA[<p>A site I&rsquo;m working on uses
<a href="https://fontawesome.com/">Font Awesome</a>. Font Awesome is an iconic font
designed for use with
<a href="https://getbootstrap.com/">Twitter&rsquo;s Bootstrap</a> and
currently (at version 4.0.0) includes 370 icons. It is an easy to use and
nice icon font. But I needed <code>PNG</code> files of the icons so I could use
the same icons in a different system.</p>
<p>Enter
<a href="https://github.com/Pythonity/font-awesome-to-png">Font Awesome to PNG</a>. It
is a Python script written by Michał Wojciechowski that allows you to do
exactly that: extract the icons from the Font Awesome <code>TTF</code> file and
save them as <code>PNG</code> files.</p>
<p>One example of how I used it to get a blue version of the comment
icon:</p>
<div class="highlight"><pre tabindex="0" class="chroma"><code class="language-bash" data-lang="bash"><span class="line"><span class="cl">./font-awesome-to-png.py --color <span class="s2">&#34;#27a4cd&#34;</span> --size <span class="m">48</span> comment
</span></span></code></pre></div><p>The result is a nice <code>PNG</code>:</p>
<p><img src="/images/comment.png" alt="Comment icon" title="Comment icon"></p>
<p>A big thank you to Michał and everyone that contributed to this code.</p>]]></content>
  </entry>
  <entry>
    <title type="html"><![CDATA[Setting up a temporary HTTP/HTTPS proxy via SSH]]></title>
    <link rel="alternate" href="https://markvanlent.dev/2013/09/19/setting-up-a-temporary-http-https-proxy-via-ssh/" type="text/html" />
    <id>https://markvanlent.dev/2013/09/19/setting-up-a-temporary-http-https-proxy-via-ssh/</id>
    <author>
      <name>map[name:Mark van Lent uri:https://markvanlent.dev/about/]</name>
    </author>
    <category term="development" />
    <category term="devops" />
    <category term="docker" />
    <category term="proxy" />
    <category term="ssh" />
    
    <updated>2022-05-10T20:18:22Z</updated>
    <published>2013-09-19T06:32:00Z</published>
    <content type="html"><![CDATA[<p>Currently I&rsquo;m working on a project where I have the staging
environment running on a virtual machine in a vlan. However, the
virtual machine cannot directly access the internet for security
reasons. This is inconvenient when I want to e.g. run a
<a href="https://www.buildout.org/en/latest/">buildout</a> to update the project.</p>
<p>A colleague told me to use
<a href="https://acme.com/software/micro_proxy/"><code>micro_proxy</code></a> and
<a href="https://acme.com/software/micro_inetd/"><code>micro_inetd</code></a> to proxy
traffic via my laptop. This is a description of how you can set things up.</p>
<div class="note update">
  <div class="note_header">
    Update (2019-07-15)<span class="hidden">:</span>
  </div>
  <div class="note_body">
    I am currently using a Docker to run a proxy on my
laptop. I have added a <a href="#docker">Docker</a> section where I describe my new
setup.
  </div>
</div>

<h2 id="ad-hoc">Ad hoc</h2>
<p>Obviously the first step is to install the relevant packages on the
local machine (Ubuntu in my case):</p>
<div class="highlight"><pre tabindex="0" class="chroma"><code class="language-bash" data-lang="bash"><span class="line"><span class="cl">$ sudo apt-get install micro-proxy micro-inetd
</span></span></code></pre></div><p>The next step is to run the proxy (again: on my laptop) and make sure
it accepts connections on port <code>3128</code>:</p>
<div class="highlight"><pre tabindex="0" class="chroma"><code class="language-bash" data-lang="bash"><span class="line"><span class="cl">$ micro-inetd <span class="m">3128</span> /usr/sbin/micro_proxy
</span></span></code></pre></div><p>Then, when you SSH into the remote machine you will have to forward
the right port:</p>
<div class="highlight"><pre tabindex="0" class="chroma"><code class="language-bash" data-lang="bash"><span class="line"><span class="cl">$ ssh box.example.com -R 3128:localhost:3128
</span></span></code></pre></div><p>Whenever you want to access the internet, you&rsquo;ll have to use the proxy
listening on port <code>3128</code>. For instance to run <code>wget</code> and <code>buildout</code>,
you can set the following environment variables:</p>
<div class="highlight"><pre tabindex="0" class="chroma"><code class="language-bash" data-lang="bash"><span class="line"><span class="cl">$ <span class="nb">export</span> <span class="nv">http_proxy</span><span class="o">=</span>http://localhost:3128
</span></span><span class="line"><span class="cl">$ <span class="nb">export</span> <span class="nv">https_proxy</span><span class="o">=</span>http://localhost:3128
</span></span></code></pre></div><p>(Note that I&rsquo;m also proxying HTTPS traffic here, which is supported by
<code>micro_proxy</code>.)</p>
<p>The following <code>wget</code> command should now succeed:</p>
<div class="highlight"><pre tabindex="0" class="chroma"><code class="language-bash" data-lang="bash"><span class="line"><span class="cl">$ wget http://www.google.com/
</span></span></code></pre></div><h2 id="repeatable">Repeatable</h2>
<p>Assuming the ad hoc setup works, you may want to configure things so
things are a little bit easier the next time you want to use it. This
is what I did.</p>
<p>So I don&rsquo;t have to remember how to start the proxy, I added this line
to the <code>~/.bashrc</code> file on my local machine:</p>
<div class="highlight"><pre tabindex="0" class="chroma"><code class="language-bash" data-lang="bash"><span class="line"><span class="cl"><span class="nb">alias</span> <span class="nv">start_proxy</span><span class="o">=</span><span class="s1">&#39;echo Running proxy on port 3128 &amp;&amp; micro-inetd 3128 /usr/sbin/micro_proxy&#39;</span>
</span></span></code></pre></div><p>The SSH command is also too much typing for my liking. So I added this
to my <code>~/.ssh/config</code> file:</p>
<div class="highlight"><pre tabindex="0" class="chroma"><code class="language-ini" data-lang="ini"><span class="line"><span class="cl"><span class="na">Host box</span>
</span></span><span class="line"><span class="cl">    <span class="na">HostName box.example.com</span>
</span></span><span class="line"><span class="cl">    <span class="na">RemoteForward 3128 localhost:3128</span>
</span></span></code></pre></div><p>To make sure that the HTTP(S) proxy is used on the remote machine, I
added this to my <code>~/.bashrc</code> file on the remote:</p>
<div class="highlight"><pre tabindex="0" class="chroma"><code class="language-bash" data-lang="bash"><span class="line"><span class="cl"><span class="nb">export</span> <span class="nv">http_proxy</span><span class="o">=</span>http://localhost:3128
</span></span><span class="line"><span class="cl"><span class="nb">export</span> <span class="nv">https_proxy</span><span class="o">=</span>http://localhost:3128
</span></span></code></pre></div><h2 id="end-result">End result</h2>
<p>So whenever I want to work on the staging environment, I open a
terminal and run:</p>
<div class="highlight"><pre tabindex="0" class="chroma"><code class="language-bash" data-lang="bash"><span class="line"><span class="cl">$ start_proxy
</span></span></code></pre></div><p>In another terminal I type:</p>
<div class="highlight"><pre tabindex="0" class="chroma"><code class="language-bash" data-lang="bash"><span class="line"><span class="cl">$ ssh box
</span></span></code></pre></div><p>And I&rsquo;m good to go.</p>
<p>Now, there may be better solutions (especially if you want to
permanently setup a proxy), but for my purposes this works great.</p>
<h2 id="docker">Docker</h2>
<div class="note update">
  <div class="note_header">
    Update (2019-07-15)<span class="hidden">:</span>
  </div>
  <div class="note_body">
    I&rsquo;ve added this section to document an alternative to the
<code>micro_inetd</code>/<code>micro_proxy</code> combination.
  </div>
</div>

<p>When I originally wrote this article, I was not yet (or only just) using Docker.
But when I was setting up a new laptop a while ago, I wanted to run a proxy in a
Docker container.</p>
<p>As a result, I now run the following to start a proxy:</p>
<div class="highlight"><pre tabindex="0" class="chroma"><code class="language-bash" data-lang="bash"><span class="line"><span class="cl">$ docker run --name squid -d -p 3128:3128 datadog/squid
</span></span></code></pre></div><p>This way I don&rsquo;t have to install <code>micro_proxy</code> and <code>micro_inetd</code> on my machine.</p>]]></content>
  </entry>
  <entry>
    <title type="html"><![CDATA[Collective.twitterportlet and Twitter API version 1.1]]></title>
    <link rel="alternate" href="https://markvanlent.dev/2013/06/13/collective-twitterportlet-and-twitter-api-version-1-1/" type="text/html" />
    <id>https://markvanlent.dev/2013/06/13/collective-twitterportlet-and-twitter-api-version-1-1/</id>
    <author>
      <name>map[name:Mark van Lent uri:https://markvanlent.dev/about/]</name>
    </author>
    <category term="development" />
    <category term="plone" />
    
    <updated>2021-11-27T22:20:54Z</updated>
    <published>2013-06-13T12:46:00Z</published>
    <content type="html"><![CDATA[<p>This week, on June 11th, Twitter retired version 1 of their API. As a
result, the Twitter portlets of some of our customers stopped
working. They are all using <code>collective.twitterportlet</code> so we created a
quick (and slightly dirty?) fix to get them up and running again:
<a href="https://pypi.org/project/edition1.twitterportletfix/">edition1.twitterportletfix</a>.</p>
<h2 id="the-problem">The problem</h2>
<p>The obvious symptom we were confronted with, was that there were no
tweets shown in the portlet. Instead, it contained the following text:</p>
<blockquote>
<p>There was an error while rendering the portlet.</p></blockquote>
<p>And the error log included entries like this:</p>
<div class="highlight"><pre tabindex="0" class="chroma"><code class="language-python" data-lang="python"><span class="line"><span class="cl"><span class="ne">AttributeError</span><span class="p">:</span> <span class="s1">&#39;unicode&#39;</span> <span class="nb">object</span> <span class="n">has</span> <span class="n">no</span> <span class="n">attribute</span> <span class="s1">&#39;get&#39;</span>
</span></span></code></pre></div><p>After vaguely recalling something about a Twitter API change, we
started looking around and found the Twitter blog entry where they
stated that the
<a href="https://blog.twitter.com/developer/en_us/a/2013/api-v1-is-retired">API v1 is retired</a>
and we should use
<a href="https://developer.twitter.com/en/docs/twitter-api/v1">API v1.1</a>. But API
version 1.1 requires you to use
<a href="https://developer.twitter.com/en/docs/authentication/faq">OAuth</a>.</p>
<p>The good news is that
<a href="https://pypi.org/project/collective.twitterportlet/">collective.twitterportlet</a>
uses <a href="https://pypi.org/project/python-twitter/">python-twitter</a>. And that
package is compatible with version 1.1 of the Twitter API. So upgrading to
version 1.0 or newer of <code>python-twitter</code>, should at least make the Twitter API
wrapper compatible.</p>
<p>The bad news is that just upgrading <code>python-twitter</code> is not enough. You
still need to give it some keys (consumer key, consumer secret,
et cetera) to get data from Twitter. Otherwise, you&rsquo;ll see these kind
of messages in you logs:</p>
<div class="highlight"><pre tabindex="0" class="chroma"><code class="language-python" data-lang="python"><span class="line"><span class="cl"><span class="n">TwitterError</span><span class="p">:</span> <span class="p">[{</span><span class="sa">u</span><span class="s1">&#39;message&#39;</span><span class="p">:</span> <span class="sa">u</span><span class="s1">&#39;Bad Authentication data&#39;</span><span class="p">,</span> <span class="sa">u</span><span class="s1">&#39;code&#39;</span><span class="p">:</span> <span class="mi">215</span><span class="p">}]</span>
</span></span></code></pre></div><h2 id="the-optimal-solution">The optimal solution</h2>
<p>In my humble opinion the optimal solution would be to do something
similar as the combination of
<a href="https://pypi.org/project/collective.facebook.portlets/">collective.facebook.portlets</a>
and
<a href="https://pypi.org/project/collective.facebook.accounts/">collective.facebook.accounts</a>
provides. That is: allow the user to configure accounts (and perhaps
even applications?) and let the user choose which account to use <em>per
portlet</em>.</p>
<p>Unfortunately this involves more work and time than we could spend at
the moment with customers waiting for their home page to look good
again.</p>
<div class="note update">
  <div class="note_header">
    Update (2013-06-14)<span class="hidden">:</span>
  </div>
  <div class="note_body">
    The package <a href="https://pypi.org/project/collective.twitter.accounts/">collective.twitter.accounts</a>
probably provides everything we&rsquo;d need. Thanks for the tip Héctor!
  </div>
</div>

<h2 id="the-quick-workaround">The quick workaround</h2>
<p>Due to the time constraint we decided to create a small package,
<a href="https://pypi.org/project/edition1.twitterportletfix/">edition1.twitterportletfix</a>,
that would solve our immediate need. This package allows the user to configure
the required keys/tokens. It also customises the <code>Renderer</code> class of the portlet
to use those keys to call the Twitter API.</p>
<p>Obviously this package will not fulfil all needs (and I&rsquo;m not really
proud of it) but for our use cases it should be enough for now. At
least until there is a better solution available.</p>
<h3 id="why-i-chose-this-solution">Why I chose this solution</h3>
<div class="note update">
  <div class="note_header">
    Update (2013-06-14)<span class="hidden">:</span>
  </div>
  <div class="note_body">
    This section was added after I got the question why it was
easier to create this package than contribute to collective.twitterportlet. A
very fair question.
  </div>
</div>

<p>As I already stated, this is not an optimal solution and I&rsquo;m not
really proud of it. So why did I still go ahead with it? There are
several reasons.</p>
<p>First of all, even if I would have liked to contribute, the
<a href="https://pypi.org/project/collective.twitterportlet/">PyPI page of collective.twitterportlet</a>
does not list a publicly available repository. Looking around on the
<a href="https://github.com/collective">collective organization on GitHub</a> also did
not turn up anything. I did find a
<a href="https://github.com/muellert/collective.twitterportlet">repo with the same name</a>
but saw no relation between the owner of the repo and the owner of the
package.</p>
<p>Furthermore, even if I had found a repository, contributing to the
original package would have delayed this fix. My current solution does
not provide a fix for every use case of the package. For instance, you
cannot have two portlets showing different accounts. But building that
proper solution (and effectively replicating the functionality of
<a href="https://pypi.org/project/collective.twitter.accounts/">collective.twitter.accounts</a>)
would have taken more time and I needed a fix for our customers sooner
rather than later.</p>
<p>(My focus was on fixing <code>collective.twitterportlet</code> rather than
replacing it. As a result I failed to look around more and did not
know about <code>collective.twitter.accounts</code> until Héctor commented on this
article. Otherwise I would have tried to have
<code>collective.twitterportlet</code> use <code>collective.twitter.accounts</code>, instead of
reinventing the wheel.)</p>
<p>So I was fully aware that <code>edition1.twitterportletfix</code> is not a
permanent solution. That is why I tried to make sure that you can
cleanly uninstall the package. Once there is a better solution
available&mdash;or you decide to replace <code>collective.twitterportlet</code>
completely&mdash;you should be able to uninstall the fix and not leave a
trace.</p>]]></content>
  </entry>
  <entry>
    <title type="html"><![CDATA[ZODB analysis]]></title>
    <link rel="alternate" href="https://markvanlent.dev/2013/02/22/zodb-analysis/" type="text/html" />
    <id>https://markvanlent.dev/2013/02/22/zodb-analysis/</id>
    <author>
      <name>map[name:Mark van Lent uri:https://markvanlent.dev/about/]</name>
    </author>
    <category term="development" />
    <category term="plone" />
    
    <updated>2021-08-20T20:23:14Z</updated>
    <published>2013-02-22T23:40:00Z</published>
    <content type="html"><![CDATA[<p>A note to myself on how to get a quick insight in the content in a
ZODB.</p>
<p>A couple of years ago I created
<a href="https://pypi.org/project/mr.inquisition/">mr.inquisition</a> to get
more insight in the content of a foreign Zope Object Database
(ZODB). And while I believe it still may have its uses (although
I haven&rsquo;t personally used it for a while), you may want to start off
with the following command:</p>
<div class="highlight"><pre tabindex="0" class="chroma"><code class="language-bash" data-lang="bash"><span class="line"><span class="cl">$ bin/zopepy -m ZODB.scripts.analyze var/filestorage/Data.fs
</span></span></code></pre></div><p>This results in for example:</p>
<div class="highlight"><pre tabindex="0" class="chroma"><code class="language-plaintext" data-lang="plaintext"><span class="line"><span class="cl">Processed 10611 records in 150 transactions
</span></span><span class="line"><span class="cl">Average record size is  571.80 bytes
</span></span><span class="line"><span class="cl">Average transaction size is 40449.41 bytes
</span></span><span class="line"><span class="cl">Types used:
</span></span><span class="line"><span class="cl">Class Name                                  Count   TBytes    Pct AvgSize
</span></span><span class="line"><span class="cl">------------------------------------------ ------ --------  ----- -------
</span></span><span class="line"><span class="cl">AccessControl.users.User                        2      262   0.0%  131.00
</span></span><span class="line"><span class="cl">App.ApplicationManager.ApplicationManager       1      107   0.0%  107.00
</span></span><span class="line"><span class="cl">App.Product.ProductFolder                       1       34   0.0%   34.00
</span></span><span class="line"><span class="cl">BTrees.IIBTree.IIBTree                        302    64876   1.1%  214.82
</span></span><span class="line"><span class="cl">BTrees.IIBTree.IITreeSet                     1952   114421   1.9%   58.62
</span></span><span class="line"><span class="cl">...
</span></span><span class="line"><span class="cl">webdav.LockItem.LockItem                       22     5817   0.1%  264.41
</span></span><span class="line"><span class="cl">...PersistentAdapterRegistry                    3    13840   0.2% 4613.33
</span></span><span class="line"><span class="cl">zope.ramcache.ram.RAMCache                      1      288   0.0%  288.00
</span></span><span class="line"><span class="cl">========================================== ====== ========  ===== =======
</span></span><span class="line"><span class="cl">                        Total Transactions    150                  39.50k
</span></span><span class="line"><span class="cl">                              Total Records  10611    5925k 100.0%  571.80
</span></span><span class="line"><span class="cl">                            Current Objects   6286    2696k  45.5%  439.25
</span></span><span class="line"><span class="cl">                                Old Objects   4325    3228k  54.5%  764.46
</span></span></code></pre></div><p>Thanks to an article by Nejc Zupan from about a week ago
(<a href="https://blog.niteo.co/dexterity-vs.-archetypes/">Dexterity vs. Archetypes</a>)
in which he used this&mdash;at least for me&mdash;hidden gem.</p>]]></content>
  </entry>
  <entry>
    <title type="html"><![CDATA[CloudFlare experiment]]></title>
    <link rel="alternate" href="https://markvanlent.dev/2012/12/27/cloudflare-experiment/" type="text/html" />
    <id>https://markvanlent.dev/2012/12/27/cloudflare-experiment/</id>
    <author>
      <name>map[name:Mark van Lent uri:https://markvanlent.dev/about/]</name>
    </author>
    <category term="blog" />
    <category term="development" />
    
    <updated>2021-08-19T13:13:50Z</updated>
    <published>2012-12-27T22:04:00Z</published>
    <content type="html"><![CDATA[<p>For about a month I have served this website using the CloudFlare free
plan. This article describes what I observed.</p>
<h2 id="why">Why</h2>
<p>Let me first explain why I started using
<a href="https://www.cloudflare.com/">CloudFlare</a>. Earlier this year I <a href="/2012/10/01/migrating-to-acrylamid/">migrated this
blog</a> from Django to a static site.  At the
same time I also switched from hosting at <a href="https://zestsoftware.nl/">Zest
Software</a> back to my old hosting provider,
<a href="https://www.bhosted.nl/">bHosted</a>. Still, I expected to see a drop in the
time required to download a page and thus in the related graph in the Google
Webmaster Tools. This is what I saw:</p>
<p><img src="/images/webtoolsstats-october.png" alt="Time to download a page: September vs October"></p>
<p>As of October 1st&mdash;when I made the switch&mdash;the time needed to
download a page didn&rsquo;t necessarily drop; instead it became more
erratic and often higher than it was before.</p>
<p>I guessed that the expected speed improvement of having a static site
was negated by hosting the site on another server. At Zest my
site was dynamic but ran on a server that had a very light load and
was only hosting a couple of sites. And at bHosted the site is
running on a shared server with a load of 2&ndash;4 (based on a few
samples) and several hundred other sites.</p>
<p>I then by chance stumbled upon the content delivery network provided
by CloudFlare. And they even have a
<a href="https://www.cloudflare.com/plans/">free plan</a>.</p>
<h2 id="setup-and-first-experience">Setup and first experience</h2>
<p>First of all, the video on the CloudFlare homepage is absolutely right
about how easy it is to setup. Sure, I know a bit about DNS but
basically they do not require you to do very hard stuff. In fact, the
most complicated I had to do was to change the name servers so they
pointed to CloudFlare. (Actually: I found out that I could not change
them myself so I had to ask my domain registrar to do this for me.)</p>
<p>Unfortunately I lost the screenshots I made of my CloudFlare
statistics. But according to those statistics, CloudFlare handled
about half of the requests and traffic. And, on the side, also blocked
quite a few, supposedly, malicious requests.</p>
<p>I made the switch around the 1st of November. I expected that the
time to download a page would be more stable but also that is would be
lower. (That&rsquo;s one of the benefits of a content distribution network,
right?) Well, I was partially right&hellip;</p>
<p><img src="/images/webtoolsstats-december.png" alt="Time to download a page: October vs November"></p>
<p>As you can see, the time to download a page indeed did not fluctuate as much
anymore. But the download time increased dramatically! And that is the reason
why I switched back to serve the content directly from the bHosted server at the
end of November, as you can see in the graph.</p>
<p>Google also assigned &ldquo;special crawl rate settings&rdquo; in the period I was
using CloudFlare. I am not sure what this means and if it&rsquo;s positive
or not. Either way, within a week after taking CloudFlare out of the
loop, it was back to normal.</p>
<p><img src="/images/crawlratesetting.png" alt="Google assigned special crawl rate settings"></p>
<h2 id="measurements">Measurements</h2>
<p>Before I decided to switch back to just bHosted, I tried to do some
experiments to see if I could reproduce the differences measured by
Google. I gathered circa 30 URLs (the home page, the ten most recent
articles, a number of popular articles and a (more or less) random
selection) and told <a href="https://www.joedog.org/siege-home/">Siege</a> to have
a crack at it. More specifically I used the options &ldquo;<code>benchmark</code>&rdquo; (to
run the requests without a delay), &ldquo;<code>internet</code>&rdquo; (which randomly hits
the URLs I selected) and &ldquo;<code>concurrent</code>&rdquo; to experiment with different
number of concurrent users. These tests ran for 60 seconds each.</p>
<p>Since the bHosted servers are located in The Netherlands, I decided
to make the measurements a bit more fair. So I did not run the test
from my home (also in The Netherlands), but a
<a href="https://ramnode.com/">RamNode</a> VPS hosted in Atlanta,
Georgia.</p>
<h3 id="results">Results</h3>
<p>The shortest transaction for both servers was stable: for bHosted it was 0.21
seconds and for CloudFlare it was 0.14 seconds. The average response time is
also comparable (the right graph lines in the image below). The longest
transactions however, differed a bit more.</p>
<figure><img src="/images/avg_max_transaction.svg"
    alt="Comparing the transaction times of the bHosted setup compared to CloudFlare for different concurrency settings"><figcaption>
      <p>Transaction times: bHosted vs CloudFlare (<a href="/files/avg_max_transaction.csv">raw data</a>, created via <a href="https://rawgraphs.io/">RAWGraphs</a>)</p>
    </figcaption>
</figure>

<p>The transaction rate of bHosted and CloudFlare seem to be comparable.
(Except for a spike in the bHosted setup at 50 concurrent simulated
users. But this could just be a happy accident&hellip;)</p>
<figure><img src="/images/transactions_per_second.svg"
    alt="Comparing the transactions/second of the bHosted setup compared to CloudFlare for different concurrency settings"><figcaption>
      <p>Transactions/sec: bHosted vs CloudFlare (<a href="/files/transactions_per_second.csv">raw data</a>, created via <a href="https://rawgraphs.io/">RAWGraphs</a>)</p>
    </figcaption>
</figure>

<h3 id="summary">Summary</h3>
<p>As you may have guessed, I am absolutely not an expert on the matter. But what I
conclude from this data is that there is not <em>that</em> much difference between
serving pages directly from a bHosted server or putting CloudFlare in between.</p>
<p>Sure, the longest transaction time in the CloudFlare setup is larger
in <em>some</em> situations. But for my blog 100+ concurrent users are
unlikely. (As a matter of fact in December an average of about 150
pages are requested per day. And Google only indexes an average of 80
pages per day at the moment of writing.) More importantly: the
<em>average</em> transaction time for bHosted and CloudFlare is
practically the same.</p>
<h2 id="conclusion">Conclusion?</h2>
<p>I am sure <strong>you</strong> should <strong>not</strong> draw the conclusion that using CloudFlare
is a bad thing. Nor do I want to complain about their service&mdash;after
all I did not pay them a dime. Having said that, my <strong>personal</strong>
conclusion was that since Google is
<a href="https://developers.google.com/search/blog/2010/04/using-site-speed-in-web-search-ranking">using site speed in web search ranking</a>
<strong>this site</strong> is better off by not using CloudFlare. Your mileage may
vary.</p>]]></content>
  </entry>
</feed>
