<?xml version="1.0" encoding="utf-8"?>
<feed xmlns="http://www.w3.org/2005/Atom" xml:lang="en">
  <title>Posts tagged with “Vagrant” on Mark van Lent’s weblog</title>
  <updated>2024-02-13T00:00:00+00:00</updated>
  <link rel="self" type="application/atom+xml" href="https://markvanlent.dev/tags/vagrant/index.xml" hreflang="en"/>
  <id>tag:markvanlent.dev,2010-04-02:/tags/vagrant/index.xml</id>
  <link rel="alternate" type="text/html" href="https://markvanlent.dev/tags/vagrant/" hreflang="en"/>
  <author>
      <name>Mark van Lent</name>
      <uri>https://markvanlent.dev/about/</uri>
    </author>
  <rights>Copyright (c) Mark van Lent, Creative Commons Attribution 4.0 International License.</rights>
  <icon>https://markvanlent.dev/favicon.ico</icon>
  <entry>
    <title type="html"><![CDATA[Custom Kali Linux ISO — part 2]]></title>
    <link rel="alternate" href="https://markvanlent.dev/2024/02/13/custom-kali-linux-iso-part-2/" type="text/html" />
    <id>https://markvanlent.dev/2024/02/13/custom-kali-linux-iso-part-2/</id>
    <author>
      <name>map[name:Mark van Lent uri:https://markvanlent.dev/about/]</name>
    </author>
    <category term="kali" />
    <category term="tools" />
    <category term="vagrant" />
    
    <updated>2024-02-13T20:03:46Z</updated>
    <published>2024-02-13T00:00:00Z</published>
    <content type="html"><![CDATA[<p>In <a href="/2024/02/11/custom-kali-linux-iso-part-1/">part 1</a> of this (mini) series I
described what I did to be able to build an ISO image using Vagrant. Now it&rsquo;s
time to actually customize it.</p>
<p>I&rsquo;ll show what I have done and will provide links to the official documentation
for more in-depth information. This post is mainly for my own reference in the
future, but others might benefit from it as wel.</p>
<p>The basis is an existing Kali Linux environment which is setup with the build
script. See the
<a href="https://www.kali.org/docs/development/live-build-a-custom-kali-iso/#getting-ready---setting-up-the-build-script-kali-system">Getting Ready</a>
section of the documentation. Long story short:</p>
<div class="highlight"><pre tabindex="0" class="chroma"><code class="language-bash" data-lang="bash"><span class="line"><span class="cl">sudo apt install -y git live-build simple-cdd cdebootstrap curl
</span></span><span class="line"><span class="cl">git clone https://gitlab.com/kalilinux/build-scripts/live-build-config.git
</span></span><span class="line"><span class="cl"><span class="nb">cd</span> live-build-config
</span></span></code></pre></div><h2 id="additional-packages">Additional packages</h2>
<p>You can include extra packages on your custom Live ISO. If these are available in the
Kali repos, it is quite simple. As described in the
<a href="https://www.kali.org/docs/development/live-build-a-custom-kali-iso/#controlling-the-packages-included-in-your-build">documentation</a>
you can edit the files (in case of the default Live ISO) in
<code>kali-config/variant-default/package-lists/kali.list.chroot</code>. I decided to put
the additional packages in a new file:</p>
<div class="highlight"><pre tabindex="0" class="chroma"><code class="language-bash" data-lang="bash"><span class="line"><span class="cl"><span class="nb">echo</span> <span class="s2">&#34;# Custom packages
</span></span></span><span class="line"><span class="cl"><span class="s2">chromium
</span></span></span><span class="line"><span class="cl"><span class="s2">torbrowser-launcher
</span></span></span><span class="line"><span class="cl"><span class="s2">&#34;</span> &gt; kali-config/variant-default/package-lists/custom.list.chroot
</span></span></code></pre></div><h2 id="additional-apt-repositories">Additional APT repositories</h2>
<p>A bit harder was the case where I wanted to add Visual Studio Code. This package
requires a separate APT repository. So let&rsquo;s start there first.</p>
<p>To be able to add the files needed, you need to create an additional directory:</p>
<div class="highlight"><pre tabindex="0" class="chroma"><code class="language-bash" data-lang="bash"><span class="line"><span class="cl">mkdir -p kali-config/common/archives
</span></span></code></pre></div><p>Now you can configure the repository:</p>
<div class="highlight"><pre tabindex="0" class="chroma"><code class="language-bash" data-lang="bash"><span class="line"><span class="cl"><span class="nb">echo</span> <span class="s2">&#34;deb [arch=amd64] https://packages.microsoft.com/repos/vscode stable main&#34;</span> &gt; kali-config/common/archives/vscode.list.chroot
</span></span><span class="line"><span class="cl">cp kali-config/common/archives/vscode.list.chroot kali-config/common/archives/vscode.list.binary
</span></span></code></pre></div><p>The first command creates a file with the <code>.chroot</code> extension and is used during
the chroot stage. To also have this file on the live system (to be able to use
APT later on to update the packages), I copy the <code>.chroot</code> file to one ending in
<code>.binary</code>. For more information on this subject, see the Debian documentation pages
<a href="https://live-team.pages.debian.net/live-manual/html/live-manual/customization-overview.en.html">Customization overview</a>
and
<a href="https://live-team.pages.debian.net/live-manual/html/live-manual/customizing-package-installation.en.html">Customizing package installation</a>.</p>
<p>The APT repository signing key also needs to be stored in the same directory:</p>
<div class="highlight"><pre tabindex="0" class="chroma"><code class="language-bash" data-lang="bash"><span class="line"><span class="cl">curl -s -o kali-config/common/archives/vscode.key https://packages.microsoft.com/keys/microsoft.asc
</span></span></code></pre></div><p>There&rsquo;s one more change that needs to be made. To make sure the build process
can actually use the packages from the added repository, you&rsquo;ll need to include a
few more packages at boot time.</p>
<p>To do this, edit the file <code>auto/config</code> and add an <code>--include</code> option to the
<code>debootstrap-options</code> line. Concretely this means changing this line:</p>
<div class="highlight"><pre tabindex="0" class="chroma"><code class="language-text" data-lang="text"><span class="line"><span class="cl">--debootstrap-options &#34;--keyring=/usr/share/keyrings/kali-archive-keyring.gpg&#34; \
</span></span></code></pre></div><p>into this:</p>
<div class="highlight"><pre tabindex="0" class="chroma"><code class="language-text" data-lang="text"><span class="line"><span class="cl">--debootstrap-options &#34;--include=apt-transport-https,ca-certificates,openssl --keyring=/usr/share/keyrings/kali-archive-keyring.gpg&#34; \
</span></span></code></pre></div><p>After that you are good to go. Just do not forget to add the package you want to
install (in this case <code>code</code>) to the list of packages. In my case this meant
updating <code>kali-config/variant-default/package-lists/custom.list.chroot</code>.</p>]]></content>
  </entry>
  <entry>
    <title type="html"><![CDATA[Custom Kali Linux ISO — part 1]]></title>
    <link rel="alternate" href="https://markvanlent.dev/2024/02/11/custom-kali-linux-iso-part-1/" type="text/html" />
    <id>https://markvanlent.dev/2024/02/11/custom-kali-linux-iso-part-1/</id>
    <author>
      <name>map[name:Mark van Lent uri:https://markvanlent.dev/about/]</name>
    </author>
    <category term="kali" />
    <category term="tools" />
    <category term="vagrant" />
    
    <updated>2024-02-13T20:03:46Z</updated>
    <published>2024-02-11T00:00:00Z</published>
    <content type="html"><![CDATA[<p>When I wanted to create a custom Kali Linux ISO using Vagrant, the allocated
disk was not big enough. Solving this required some searching and putting
several bits of information together. This post shows how I increased the disk
size.</p>
<p>The Kali documentation contains a nice page about <a href="https://www.kali.org/docs/development/live-build-a-custom-kali-iso/">creating a custom Kali
ISO</a>. That
page states that <q>[i]deally, you should build your custom
Kali ISO from within a pre-existing Kali environment, [&hellip;]</q> so I
decided to use <a href="https://www.vagrantup.com/">Vagrant</a> to create a virtual machine
which I could use.</p>
<p>The basic configuration for that box:</p>
<div class="highlight"><pre tabindex="0" class="chroma"><code class="language-ruby" data-lang="ruby"><span class="line"><span class="cl"><span class="no">Vagrant</span><span class="o">.</span><span class="n">configure</span><span class="p">(</span><span class="s2">&#34;2&#34;</span><span class="p">)</span> <span class="k">do</span> <span class="o">|</span><span class="n">config</span><span class="o">|</span>
</span></span><span class="line"><span class="cl">  <span class="n">config</span><span class="o">.</span><span class="n">vm</span><span class="o">.</span><span class="n">box</span> <span class="o">=</span> <span class="s2">&#34;kalilinux/rolling&#34;</span>
</span></span><span class="line"><span class="cl">
</span></span><span class="line"><span class="cl">  <span class="n">config</span><span class="o">.</span><span class="n">vm</span><span class="o">.</span><span class="n">provider</span> <span class="s2">&#34;virtualbox&#34;</span> <span class="k">do</span> <span class="o">|</span><span class="n">vb</span><span class="o">|</span>
</span></span><span class="line"><span class="cl">    <span class="c1"># Do not display the VirtualBox GUI when booting the machine</span>
</span></span><span class="line"><span class="cl">    <span class="n">vb</span><span class="o">.</span><span class="n">gui</span> <span class="o">=</span> <span class="kp">false</span>
</span></span><span class="line"><span class="cl">  <span class="k">end</span>
</span></span><span class="line"><span class="cl"><span class="k">end</span>
</span></span></code></pre></div><p>When I started building the ISO, the default 40G disk filled up and the process
could not be completed.</p>
<p>To solve this, the first step was to have Vagrant resize the disk for the
machine. You can do this by adding a single line to your configuration.
(For details see the relevant
<a href="https://developer.hashicorp.com/vagrant/docs/disks/usage">Vagrant documentation</a>.)</p>
<div class="highlight"><pre tabindex="0" class="chroma"><code class="language-ruby" data-lang="ruby"><span class="line"><span class="cl"><span class="no">Vagrant</span><span class="o">.</span><span class="n">configure</span><span class="p">(</span><span class="s2">&#34;2&#34;</span><span class="p">)</span> <span class="k">do</span> <span class="o">|</span><span class="n">config</span><span class="o">|</span>
</span></span><span class="line"><span class="cl">  <span class="n">config</span><span class="o">.</span><span class="n">vm</span><span class="o">.</span><span class="n">box</span> <span class="o">=</span> <span class="s2">&#34;kalilinux/rolling&#34;</span>
</span></span><span class="line hl"><span class="cl">  <span class="n">config</span><span class="o">.</span><span class="n">vm</span><span class="o">.</span><span class="n">disk</span> <span class="ss">:disk</span><span class="p">,</span> <span class="ss">size</span><span class="p">:</span> <span class="s2">&#34;50GB&#34;</span><span class="p">,</span> <span class="ss">primary</span><span class="p">:</span> <span class="kp">true</span>
</span></span><span class="line"><span class="cl">
</span></span><span class="line"><span class="cl">  <span class="n">config</span><span class="o">.</span><span class="n">vm</span><span class="o">.</span><span class="n">provider</span> <span class="s2">&#34;virtualbox&#34;</span> <span class="k">do</span> <span class="o">|</span><span class="n">vb</span><span class="o">|</span>
</span></span><span class="line"><span class="cl">    <span class="c1"># Do not display the VirtualBox GUI when booting the machine</span>
</span></span><span class="line"><span class="cl">    <span class="n">vb</span><span class="o">.</span><span class="n">gui</span> <span class="o">=</span> <span class="kp">false</span>
</span></span><span class="line"><span class="cl">  <span class="k">end</span>
</span></span><span class="line"><span class="cl"><span class="k">end</span></span></span></code></pre></div>
<p>While this increases the size of the disk, I still had to increase the
partition in the OS. This was a bit more involved, but by adding a couple of
commands in a <code>config.vm.provision</code> section, I got it working without needing to
reboot the machine afterwards:</p>
<div class="highlight"><pre tabindex="0" class="chroma"><code class="language-ruby" data-lang="ruby"><span class="line"><span class="cl"><span class="no">Vagrant</span><span class="o">.</span><span class="n">configure</span><span class="p">(</span><span class="s2">&#34;2&#34;</span><span class="p">)</span> <span class="k">do</span> <span class="o">|</span><span class="n">config</span><span class="o">|</span>
</span></span><span class="line"><span class="cl">  <span class="n">config</span><span class="o">.</span><span class="n">vm</span><span class="o">.</span><span class="n">box</span> <span class="o">=</span> <span class="s2">&#34;kalilinux/rolling&#34;</span>
</span></span><span class="line"><span class="cl">  <span class="n">config</span><span class="o">.</span><span class="n">vm</span><span class="o">.</span><span class="n">disk</span> <span class="ss">:disk</span><span class="p">,</span> <span class="ss">size</span><span class="p">:</span> <span class="s2">&#34;50GB&#34;</span><span class="p">,</span> <span class="ss">primary</span><span class="p">:</span> <span class="kp">true</span>
</span></span><span class="line"><span class="cl">
</span></span><span class="line"><span class="cl">  <span class="n">config</span><span class="o">.</span><span class="n">vm</span><span class="o">.</span><span class="n">provider</span> <span class="s2">&#34;virtualbox&#34;</span> <span class="k">do</span> <span class="o">|</span><span class="n">vb</span><span class="o">|</span>
</span></span><span class="line"><span class="cl">    <span class="c1"># Do not display the VirtualBox GUI when booting the machine</span>
</span></span><span class="line"><span class="cl">    <span class="n">vb</span><span class="o">.</span><span class="n">gui</span> <span class="o">=</span> <span class="kp">false</span>
</span></span><span class="line"><span class="cl">  <span class="k">end</span>
</span></span><span class="line"><span class="cl">  <span class="n">config</span><span class="o">.</span><span class="n">vm</span><span class="o">.</span><span class="n">provision</span> <span class="s2">&#34;shell&#34;</span><span class="p">,</span> <span class="ss">inline</span><span class="p">:</span> <span class="s">&lt;&lt;-SHELL
</span></span></span><span class="line"><span class="cl"><span class="s"></span>    <span class="n">apt</span><span class="o">-</span><span class="n">get</span> <span class="n">update</span>
</span></span><span class="line"><span class="cl">    <span class="n">apt</span><span class="o">-</span><span class="n">get</span> <span class="n">install</span> <span class="o">-</span><span class="n">y</span> <span class="n">cloud</span><span class="o">-</span><span class="n">guest</span><span class="o">-</span><span class="n">utils</span>
</span></span><span class="line"><span class="cl">    <span class="n">swapoff</span> <span class="o">-</span><span class="n">a</span>
</span></span><span class="line"><span class="cl">    <span class="n">echo</span> <span class="s1">&#39;+10G,&#39;</span> <span class="o">|</span> <span class="n">sfdisk</span> <span class="o">--</span><span class="n">move</span><span class="o">-</span><span class="n">data</span> <span class="o">--</span><span class="n">force</span> <span class="sr">/dev/s</span><span class="n">da</span> <span class="o">-</span><span class="n">N</span> <span class="mi">2</span>
</span></span><span class="line"><span class="cl">    <span class="n">partprobe</span>
</span></span><span class="line"><span class="cl">    <span class="n">growpart</span> <span class="sr">/dev/s</span><span class="n">da</span> <span class="mi">1</span>
</span></span><span class="line"><span class="cl">    <span class="n">resize2fs</span> <span class="sr">/dev/s</span><span class="n">da1</span>
</span></span><span class="line"><span class="cl">    <span class="n">swapon</span> <span class="o">-</span><span class="n">a</span>
</span></span><span class="line"><span class="cl">  <span class="no">SHELL</span>
</span></span><span class="line"><span class="cl"><span class="k">end</span>
</span></span></code></pre></div><p>Running &ldquo;<code>vagrant up</code>&rdquo; now does all the heavy lifting for you. Do note that
resizing the disk and making the extra space available to the OS takes
significantly more time when creating the machine (compared to using a machine
with the default disk size). Then again: if you know this, you can plan to have
a cup of coffee (or tea if you are like me) in that time.</p>
<p>The end result:</p>
<div class="highlight"><pre tabindex="0" class="chroma"><code class="language-text" data-lang="text"><span class="line"><span class="cl">┌──(vagrant㉿kali)-[~]
</span></span><span class="line"><span class="cl">└─$ df -h
</span></span><span class="line"><span class="cl">Filesystem      Size  Used Avail Use% Mounted on
</span></span><span class="line"><span class="cl">udev            942M     0  942M   0% /dev
</span></span><span class="line"><span class="cl">tmpfs           197M  896K  196M   1% /run
</span></span><span class="line hl"><span class="cl">/dev/sda1        48G   14G   32G  31% /
</span></span><span class="line"><span class="cl">tmpfs           983M     0  983M   0% /dev/shm
</span></span><span class="line"><span class="cl">tmpfs           5.0M     0  5.0M   0% /run/lock
</span></span><span class="line"><span class="cl">tmpfs           197M  116K  197M   1% /run/user/126
</span></span><span class="line"><span class="cl">vagrant         232G  173G   59G  75% /vagrant
</span></span><span class="line"><span class="cl">tmpfs           197M  112K  197M   1% /run/user/1000</span></span></code></pre></div>
<p>Time to create a custom Kali ISO&hellip; See
<a href="/2024/02/13/custom-kali-linux-iso-part-2/">part 2</a> for how I added extra
packages to the ISO.</p>]]></content>
  </entry>
  <entry>
    <title type="html"><![CDATA[How to create a custom Vagrant box]]></title>
    <link rel="alternate" href="https://markvanlent.dev/2014/12/19/how-to-create-a-custom-vagrant-box/" type="text/html" />
    <id>https://markvanlent.dev/2014/12/19/how-to-create-a-custom-vagrant-box/</id>
    <author>
      <name>map[name:Mark van Lent uri:https://markvanlent.dev/about/]</name>
    </author>
    <category term="devops" />
    <category term="tools" />
    <category term="virtualbox" />
    <category term="vagrant" />
    
    <updated>2021-09-24T11:41:49Z</updated>
    <published>2014-12-19T11:01:00Z</published>
    <content type="html"><![CDATA[<p>This is a description of how I created a custom Vagrant box starting
from a Lubuntu 14.04 desktop CD.</p>
<p>This post is based on the instructions that were published by Angel
Ruiz in his article
<a href="http://aruizca.com/steps-to-create-a-vagrant-base-box-with-ubuntu-14-04-desktop-gui-and-virtualbox/">Steps to create a Vagrant Base Box with Ubuntu 14.04 Desktop (GUI) and VirtualBox</a>.
By publishing my version here, it is easier for me to reproduce this
if I want to create a new version.</p>
<p>I&rsquo;m assuming that <a href="https://www.virtualbox.org/">VirtualBox</a> and
<a href="https://www.vagrantup.com/">Vagrant</a> are already installed.</p>
<h2 id="create-a-virtual-machine">Create a virtual machine</h2>
<p>First I downloaded the correct ISO, in this case &ldquo;Lubuntu 14.04.1 Desktop
AMD64&rdquo;, and used this to create a new virtual machine in VirtualBox. During the
installation process I made sure that the user name is &ldquo;<code>vagrant</code>&rdquo;.</p>
<p>After the installation was done and I rebooted, I made sure the system
was up-to-date. To save some disk space, I removed the original kernel
(3.13.0-32) and rebooted so the updated kernel was used (3.13.0-43).</p>
<div class="highlight"><pre tabindex="0" class="chroma"><code class="language-bash" data-lang="bash"><span class="line"><span class="cl">$ sudo apt-get update <span class="o">&amp;&amp;</span> sudo apt-get dist-upgrade -y
</span></span><span class="line"><span class="cl">$ sudo apt-get purge -y linux-image-3.13.0-32-generic linux-image-extra-3.13.0-32-generic linux-headers-3.13.0-32 linux-headers-3.13.0-32-generic
</span></span><span class="line"><span class="cl">$ sudo shutdown -r now
</span></span></code></pre></div><h2 id="make-the-machine-vagrant-compatible">Make the machine &lsquo;vagrant compatible&rsquo;</h2>
<p>A basic setup is needed for Vagrant to function.</p>
<h3 id="passwordless-sudo-command">Passwordless &ldquo;sudo&rdquo; command</h3>
<p>Vagrant expects the default SSH user to have passwordless <code>sudo</code>
configured.</p>
<div class="highlight"><pre tabindex="0" class="chroma"><code class="language-bash" data-lang="bash"><span class="line"><span class="cl">$ sudo su -
</span></span><span class="line"><span class="cl">$ <span class="nb">export</span> <span class="nv">EDITOR</span><span class="o">=</span>vi  <span class="c1"># my personal preference over nano</span>
</span></span><span class="line"><span class="cl">$ visudo
</span></span></code></pre></div><p>This allowed me to add this line:</p>
<div class="highlight"><pre tabindex="0" class="chroma"><code class="language-plaintext" data-lang="plaintext"><span class="line"><span class="cl">vagrant ALL=(ALL) NOPASSWD:ALL
</span></span></code></pre></div><p>Back to the <code>vagrant</code> user.</p>
<div class="highlight"><pre tabindex="0" class="chroma"><code class="language-bash" data-lang="bash"><span class="line"><span class="cl">$ <span class="nb">exit</span>
</span></span></code></pre></div><h3 id="ssh">SSH</h3>
<p>Vagrant needs to be able to SSH into the machine. So I installed an
SSH server.</p>
<div class="highlight"><pre tabindex="0" class="chroma"><code class="language-bash" data-lang="bash"><span class="line"><span class="cl">$ sudo apt-get install -y openssh-server
</span></span></code></pre></div><p>By default the SSH server runs on port 22 and allows login with a
public key (due to the line &ldquo;<code>PubkeyAuthentication yes</code>&rdquo; in
<code>/etc/ssh/sshd_config</code>). So I did not have to change anything there.</p>
<p>I added the Vagrant SSH keypair to the authorised keys of the <code>vagrant</code> user.</p>
<div class="highlight"><pre tabindex="0" class="chroma"><code class="language-bash" data-lang="bash"><span class="line"><span class="cl">$ mkdir -p /home/vagrant/.ssh
</span></span><span class="line"><span class="cl">$ wget --no-check-certificate https://raw.github.com/mitchellh/vagrant/master/keys/vagrant.pub -O /home/vagrant/.ssh/authorized_keys
</span></span><span class="line"><span class="cl">$ chmod <span class="m">0700</span> /home/vagrant/.ssh
</span></span><span class="line"><span class="cl">$ chmod <span class="m">0600</span> /home/vagrant/.ssh/authorized_keys
</span></span><span class="line"><span class="cl">$ chown -R vagrant /home/vagrant/.ssh
</span></span></code></pre></div><h3 id="guest-additions">Guest Additions</h3>
<p>To use shared folders I needed to install the Guest Additions. But
first a bit of preparation was needed.</p>
<div class="highlight"><pre tabindex="0" class="chroma"><code class="language-bash" data-lang="bash"><span class="line"><span class="cl">$ sudo apt-get install -y dkms build-essential linux-headers-generic
</span></span></code></pre></div><p>Now I could install the Guest Additions.</p>
<p><img src="/images/virtualbox-install-guest-additions.png" alt="Install the VirtualBox Guest Additions"></p>
<p>
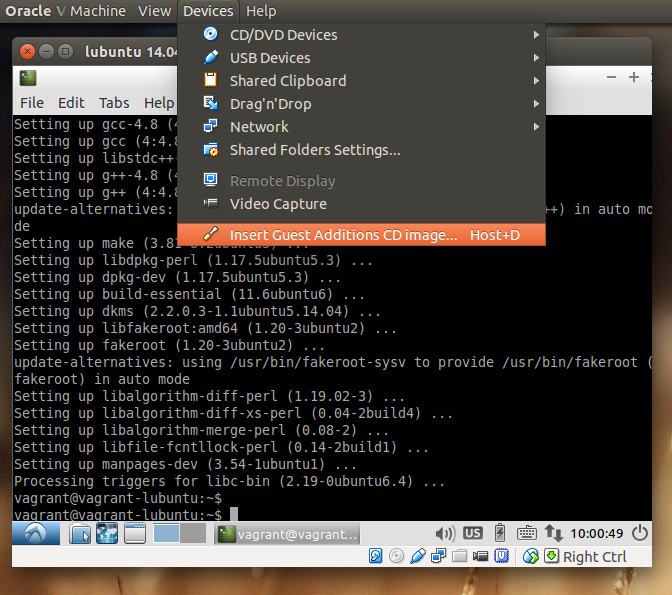
After mounting the ISO, I manually started the installation.</p>
<div class="highlight"><pre tabindex="0" class="chroma"><code class="language-bash" data-lang="bash"><span class="line"><span class="cl">$ sudo /media/vagrant/VBOXADDITIONS_4.3.20_96996/autorun.sh
</span></span><span class="line"><span class="cl">$ sudo umount /media/vagrant/VBOXADDITIONS_4.3.20_96996
</span></span></code></pre></div><h3 id="puppet">Puppet</h3>
<p>Since I&rsquo;ll be configuring the Vagrant boxes using
<a href="https://puppet.com/">Puppet</a>, I also installed Puppet.</p>
<div class="highlight"><pre tabindex="0" class="chroma"><code class="language-bash" data-lang="bash"><span class="line"><span class="cl">$ sudo apt-get install -y puppet-common
</span></span></code></pre></div><h2 id="cleanup">Cleanup</h2>
<p>To make the image a little smaller, I removed a couple of packages I
usually won&rsquo;t need anyway.</p>
<div class="highlight"><pre tabindex="0" class="chroma"><code class="language-bash" data-lang="bash"><span class="line"><span class="cl">$ sudo apt-get purge -y abiword* gnumeric* build-essential cpp-4.8 g++-4.8 libc-dev libc6-dev libgcc-4.8-dev make linux-libc-dev dpkg-dev
</span></span><span class="line"><span class="cl">$ sudo apt-get autoclean <span class="o">&amp;&amp;</span> sudo apt-get clean
</span></span></code></pre></div><p>There were probably more packages I could have removed to get to a
minimum, but this was enough for me.</p>
<p>To get a list of the installed packages and their size, I used this
command (thanks to user &ldquo;raspi&rdquo; over at
<a href="https://www.commandlinefu.com/commands/view/3890/list-installed-deb-packages-by-size">commandlinefu.com</a>):</p>
<div class="highlight"><pre tabindex="0" class="chroma"><code class="language-bash" data-lang="bash"><span class="line"><span class="cl">$ dpkg-query -Wf <span class="s1">&#39;${Installed-Size}\t${Package}\n&#39;</span> <span class="p">|</span> sort -n
</span></span></code></pre></div><p>Next item on the list: reduce the size of the <code>.vdi</code> file by making sure
all the free space only has zeros and then compacting the file.</p>
<p>On the <strong>guest</strong>:</p>
<div class="highlight"><pre tabindex="0" class="chroma"><code class="language-bash" data-lang="bash"><span class="line"><span class="cl">$ sudo dd <span class="k">if</span><span class="o">=</span>/dev/zero <span class="nv">of</span><span class="o">=</span>/ZEROS <span class="nv">bs</span><span class="o">=</span>1M
</span></span><span class="line"><span class="cl">$ sudo rm /ZEROS
</span></span><span class="line"><span class="cl">$ sudo shutdown -h now
</span></span></code></pre></div><p>On the <strong>host</strong>:</p>
<div class="highlight"><pre tabindex="0" class="chroma"><code class="language-bash" data-lang="bash"><span class="line"><span class="cl">$ vboxmanage modifyhd <span class="s2">&#34;/home/mark/VirtualBox VMs/lubuntu 14.04 desktop amd64/lubuntu 14.04 desktop amd64.vdi&#34;</span> --compact
</span></span></code></pre></div><p>This resulted in a reduction from 4.1GB to 2.7GB.</p>
<h2 id="package-the-box">Package the box</h2>
<p>Although you can argue whether the current virtual machine is a &ldquo;bare
minimum required for Vagrant&rdquo;, it&rsquo;ll do for my purposes. So it was time
to package it.</p>
<p>Since this is a box where I&rsquo;ll want the GUI by default, I created a
<code>Vagrantfile</code>:</p>
<div class="highlight"><pre tabindex="0" class="chroma"><code class="language-ruby" data-lang="ruby"><span class="line"><span class="cl"><span class="no">Vagrant</span><span class="o">.</span><span class="n">configure</span><span class="p">(</span><span class="s2">&#34;2&#34;</span><span class="p">)</span> <span class="k">do</span> <span class="o">|</span><span class="n">config</span><span class="o">|</span>
</span></span><span class="line"><span class="cl">  <span class="n">config</span><span class="o">.</span><span class="n">vm</span><span class="o">.</span><span class="n">provider</span> <span class="s2">&#34;virtualbox&#34;</span> <span class="k">do</span> <span class="o">|</span><span class="n">vb</span><span class="o">|</span>
</span></span><span class="line"><span class="cl">    <span class="c1"># Don&#39;t boot with headless mode</span>
</span></span><span class="line"><span class="cl">    <span class="n">vb</span><span class="o">.</span><span class="n">gui</span> <span class="o">=</span> <span class="kp">true</span>
</span></span><span class="line"><span class="cl">  <span class="k">end</span>
</span></span><span class="line"><span class="cl"><span class="k">end</span>
</span></span></code></pre></div><p>(By including this file in the box, see the next command, this little
piece of configuration is loaded when the box is used. It will be
first in the
<a href="https://www.vagrantup.com/docs/vagrantfile#load-order">load order</a>.)</p>
<p>Then I executed the following commands:</p>
<div class="highlight"><pre tabindex="0" class="chroma"><code class="language-bash" data-lang="bash"><span class="line"><span class="cl">$ vagrant package --base <span class="s2">&#34;lubuntu 14.04 desktop amd64&#34;</span> --vagrantfile Vagrantfile
</span></span><span class="line"><span class="cl">$ vagrant box add lubuntu-14.04-desktop-amd64 package.box
</span></span></code></pre></div><p>The first command creates a <code>package.box</code> file from the virtual
machine called &ldquo;lubuntu 14.04 desktop amd64&rdquo;. This file is then used
in the second command. The new base box
&ldquo;<code>lubuntu-14.04-desktop-amd64</code>&rdquo; is now available for use.</p>
<h2 id="use-the-box">Use the box</h2>
<p>
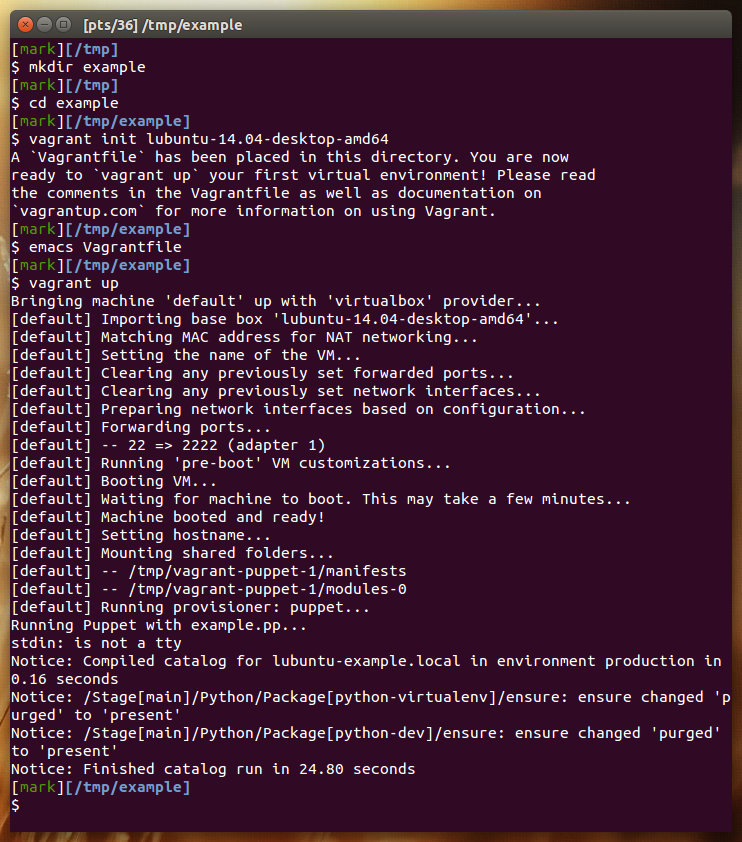
To use the custom base box, you have to initialise a Vagrant
environment by creating an initial <code>Vagrantfile</code>, just as normal.</p>
<div class="highlight"><pre tabindex="0" class="chroma"><code class="language-bash" data-lang="bash"><span class="line"><span class="cl">$ vagrant init lubuntu-14.04-desktop-amd64
</span></span></code></pre></div><p>The last step:</p>
<div class="highlight"><pre tabindex="0" class="chroma"><code class="language-bash" data-lang="bash"><span class="line"><span class="cl">$ vagrant up
</span></span></code></pre></div><p><img src="/images/vagrant-use-new-box.png" alt="Using the new box"></p>
<p>(Note that I edited the final Vagrantfile in the project directory to
use the Puppet provisioner. But that is beyond the scope of this
article.)</p>
<h2 id="more-information">More information</h2>
<p>As I stated earlier, this is mostly a mix of information that is
already online elsewhere, e.g.:</p>
<ul>
<li>aruizca&rsquo;s blog: <a href="http://aruizca.com/steps-to-create-a-vagrant-base-box-with-ubuntu-14-04-desktop-gui-and-virtualbox/">Steps to create a Vagrant Base Box with Ubuntu 14.04 Desktop (GUI) and VirtualBox</a></li>
<li>Vagrant docs: <a href="https://www.vagrantup.com/docs/boxes/base">Generic guide to creating a base box</a></li>
<li>Vagrant docs: <a href="https://www.vagrantup.com/docs/providers/virtualbox/boxes">VirtualBox specific guide to creating a base box</a></li>
</ul>
<h2 id="failed-to-mount-folders">Failed to mount folders?</h2>
<p>Initially I had the <code>virtualbox</code> package installed on my Ubuntu host
and used this to create my virtual machine. However, when I started
the virtual machine with Vagrant, I got the following error:</p>
<div class="highlight"><pre tabindex="0" class="chroma"><code class="language-plaintext" data-lang="plaintext"><span class="line"><span class="cl">Failed to mount folders in Linux guest. This is usually because
</span></span><span class="line"><span class="cl">the &#34;vboxsf&#34; file system is not available. Please verify that
</span></span><span class="line"><span class="cl">the guest additions are properly installed in the guest and
</span></span><span class="line"><span class="cl">can work properly. The command attempted was:
</span></span><span class="line"><span class="cl">
</span></span><span class="line"><span class="cl">mount -t vboxsf -o uid=`id -u vagrant`,gid=`getent group vagrant | cut -d: -f3` /vagrant /vagrant
</span></span><span class="line"><span class="cl">mount -t vboxsf -o uid=`id -u vagrant`,gid=`id -g vagrant` /vagrant /vagrant
</span></span></code></pre></div><p>Apparently this
<a href="https://www.virtualbox.org/ticket/12879">problem with shared folders</a>
is a known issue. It should be solved in version 4.3.12, but
Ubuntu 14.04 ships with VirtualBox version 4.3.10.  And unfortunately
the workaround listed in the issue
(<a href="https://www.virtualbox.org/ticket/12879#comment:2">creating a symlink</a>)
did not work for me.</p>
<p>For me the easiest solution seemed to be to add a new package
repository to my host machine (see the page
<a href="https://www.virtualbox.org/wiki/Linux_Downloads#Debian-basedLinuxdistributions">Download VirtualBox for Linux Hosts</a>)
and install the <code>virtualbox-4.3</code> package, which provides version
4.3.20 (at the time of writing). After creating a new base box with
this version of VirtualBox, Vagrant could mount the shared folders
properly.</p>]]></content>
  </entry>
</feed>
