How to create a custom Vagrant box
This is a description of how I created a custom Vagrant box starting from a Lubuntu 14.04 desktop CD.
This post is based on the instructions that were published by Angel Ruiz in his article Steps to create a Vagrant Base Box with Ubuntu 14.04 Desktop (GUI) and VirtualBox. By publishing my version here, it is easier for me to reproduce this if I want to create a new version.
I’m assuming that VirtualBox and Vagrant are already installed.
Create a virtual machine
First I downloaded the correct ISO, in this case “Lubuntu 14.04.1 Desktop
AMD64”, and used this to create a new virtual machine in VirtualBox. During the
installation process I made sure that the user name is “vagrant”.
After the installation was done and I rebooted, I made sure the system was up-to-date. To save some disk space, I removed the original kernel (3.13.0-32) and rebooted so the updated kernel was used (3.13.0-43).
$ sudo apt-get update && sudo apt-get dist-upgrade -y
$ sudo apt-get purge -y linux-image-3.13.0-32-generic linux-image-extra-3.13.0-32-generic linux-headers-3.13.0-32 linux-headers-3.13.0-32-generic
$ sudo shutdown -r now
Make the machine ‘vagrant compatible’
A basic setup is needed for Vagrant to function.
Passwordless “sudo” command
Vagrant expects the default SSH user to have passwordless sudo
configured.
$ sudo su -
$ export EDITOR=vi  # my personal preference over nano
$ visudo
This allowed me to add this line:
vagrant ALL=(ALL) NOPASSWD:ALL
Back to the vagrant user.
$ exit
SSH
Vagrant needs to be able to SSH into the machine. So I installed an SSH server.
$ sudo apt-get install -y openssh-server
By default the SSH server runs on port 22 and allows login with a
public key (due to the line “PubkeyAuthentication yes” in
/etc/ssh/sshd_config). So I did not have to change anything there.
I added the Vagrant SSH keypair to the authorised keys of the vagrant user.
$ mkdir -p /home/vagrant/.ssh
$ wget --no-check-certificate https://raw.github.com/mitchellh/vagrant/master/keys/vagrant.pub -O /home/vagrant/.ssh/authorized_keys
$ chmod 0700 /home/vagrant/.ssh
$ chmod 0600 /home/vagrant/.ssh/authorized_keys
$ chown -R vagrant /home/vagrant/.ssh
Guest Additions
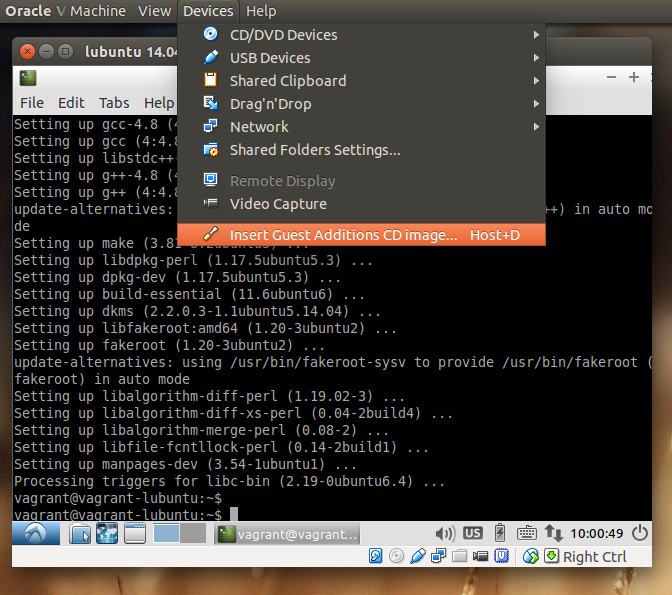
To use shared folders I needed to install the Guest Additions. But first a bit of preparation was needed.
$ sudo apt-get install -y dkms build-essential linux-headers-generic
Now I could install the Guest Additions.

After mounting the ISO, I manually started the installation.
$ sudo /media/vagrant/VBOXADDITIONS_4.3.20_96996/autorun.sh
$ sudo umount /media/vagrant/VBOXADDITIONS_4.3.20_96996
Puppet
Since I’ll be configuring the Vagrant boxes using Puppet, I also installed Puppet.
$ sudo apt-get install -y puppet-common
Cleanup
To make the image a little smaller, I removed a couple of packages I usually won’t need anyway.
$ sudo apt-get purge -y abiword* gnumeric* build-essential cpp-4.8 g++-4.8 libc-dev libc6-dev libgcc-4.8-dev make linux-libc-dev dpkg-dev
$ sudo apt-get autoclean && sudo apt-get clean
There were probably more packages I could have removed to get to a minimum, but this was enough for me.
To get a list of the installed packages and their size, I used this command (thanks to user “raspi” over at commandlinefu.com):
$ dpkg-query -Wf '${Installed-Size}\t${Package}\n' | sort -n
Next item on the list: reduce the size of the .vdi file by making sure
all the free space only has zeros and then compacting the file.
On the guest:
$ sudo dd if=/dev/zero of=/ZEROS bs=1M
$ sudo rm /ZEROS
$ sudo shutdown -h now
On the host:
$ vboxmanage modifyhd "/home/mark/VirtualBox VMs/lubuntu 14.04 desktop amd64/lubuntu 14.04 desktop amd64.vdi" --compact
This resulted in a reduction from 4.1GB to 2.7GB.
Package the box
Although you can argue whether the current virtual machine is a “bare minimum required for Vagrant”, it’ll do for my purposes. So it was time to package it.
Since this is a box where I’ll want the GUI by default, I created a
Vagrantfile:
Vagrant.configure("2") do |config|
  config.vm.provider "virtualbox" do |vb|
    # Don't boot with headless mode
    vb.gui = true
  end
end
(By including this file in the box, see the next command, this little piece of configuration is loaded when the box is used. It will be first in the load order.)
Then I executed the following commands:
$ vagrant package --base "lubuntu 14.04 desktop amd64" --vagrantfile Vagrantfile
$ vagrant box add lubuntu-14.04-desktop-amd64 package.box
The first command creates a package.box file from the virtual
machine called “lubuntu 14.04 desktop amd64”. This file is then used
in the second command. The new base box
“lubuntu-14.04-desktop-amd64” is now available for use.
Use the box
To use the custom base box, you have to initialise a Vagrant
environment by creating an initial Vagrantfile, just as normal.
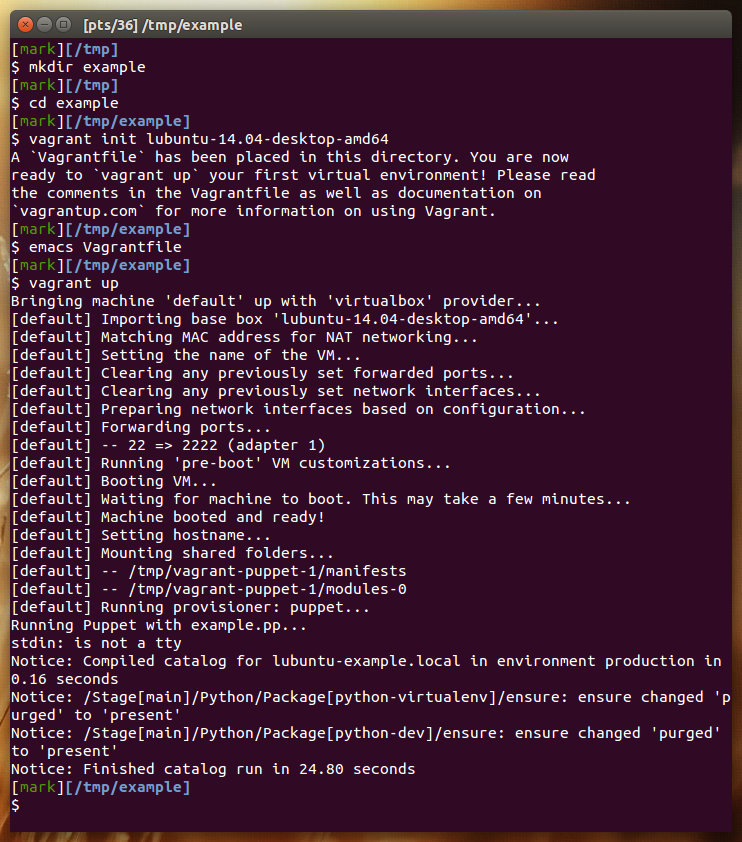
$ vagrant init lubuntu-14.04-desktop-amd64
The last step:
$ vagrant up

(Note that I edited the final Vagrantfile in the project directory to use the Puppet provisioner. But that is beyond the scope of this article.)
More information
As I stated earlier, this is mostly a mix of information that is already online elsewhere, e.g.:
- aruizca’s blog: Steps to create a Vagrant Base Box with Ubuntu 14.04 Desktop (GUI) and VirtualBox
- Vagrant docs: Generic guide to creating a base box
- Vagrant docs: VirtualBox specific guide to creating a base box
Failed to mount folders?
Initially I had the virtualbox package installed on my Ubuntu host
and used this to create my virtual machine. However, when I started
the virtual machine with Vagrant, I got the following error:
Failed to mount folders in Linux guest. This is usually because
the "vboxsf" file system is not available. Please verify that
the guest additions are properly installed in the guest and
can work properly. The command attempted was:

mount -t vboxsf -o uid=`id -u vagrant`,gid=`getent group vagrant | cut -d: -f3` /vagrant /vagrant
mount -t vboxsf -o uid=`id -u vagrant`,gid=`id -g vagrant` /vagrant /vagrant
Apparently this problem with shared folders is a known issue. It should be solved in version 4.3.12, but Ubuntu 14.04 ships with VirtualBox version 4.3.10. And unfortunately the workaround listed in the issue (creating a symlink) did not work for me.
For me the easiest solution seemed to be to add a new package
repository to my host machine (see the page
Download VirtualBox for Linux Hosts)
and install the virtualbox-4.3 package, which provides version
4.3.20 (at the time of writing). After creating a new base box with
this version of VirtualBox, Vagrant could mount the shared folders
properly.